Introduction
The Virtual Terminal allows merchants to process transactions, manage customer profiles, and customize receipts through a simple interface. This guide walks through configuring the virtual terminal settings, receipts, and performing transactions.
Configuring Virtual Terminal Settings
To configure the Virtual Terminal settings, follow these steps:
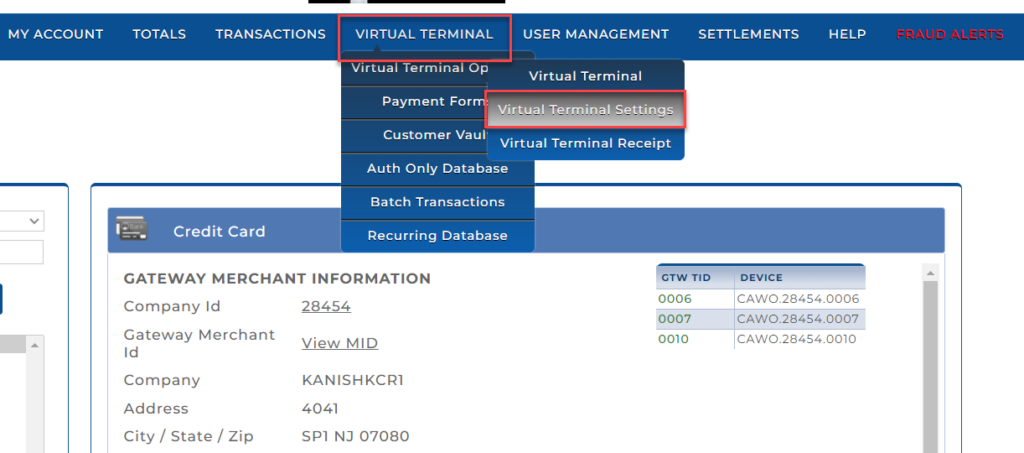
1. Accessing Virtual Terminal Settings
- Login to Transaction Manager.
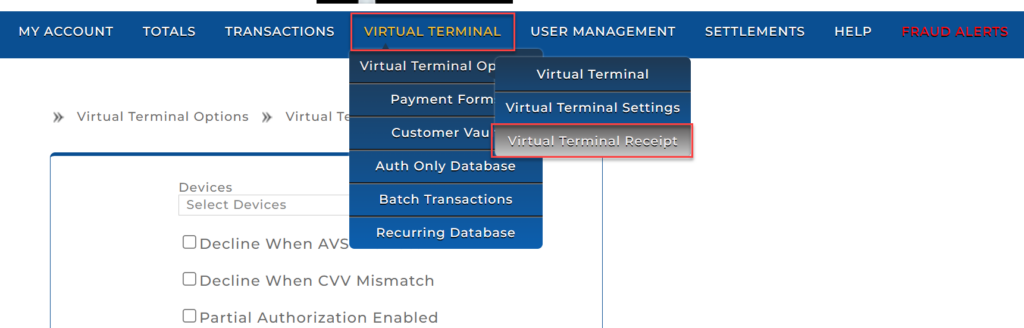
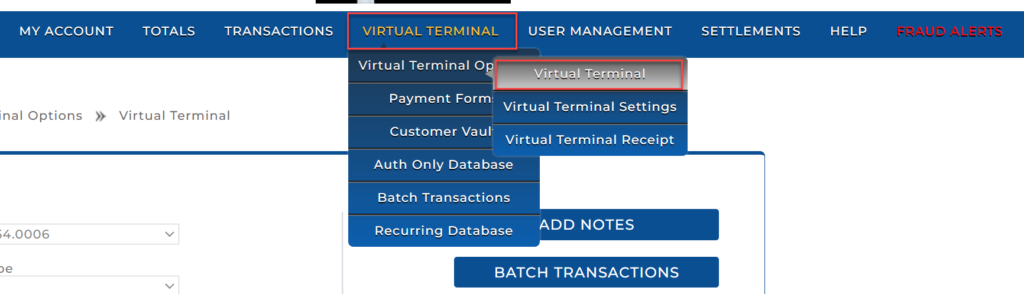
- Select Virtual Terminal Options under Virtual Terminal in the top menu.
- Select Virtual Terminal Settings from the dropdown list.
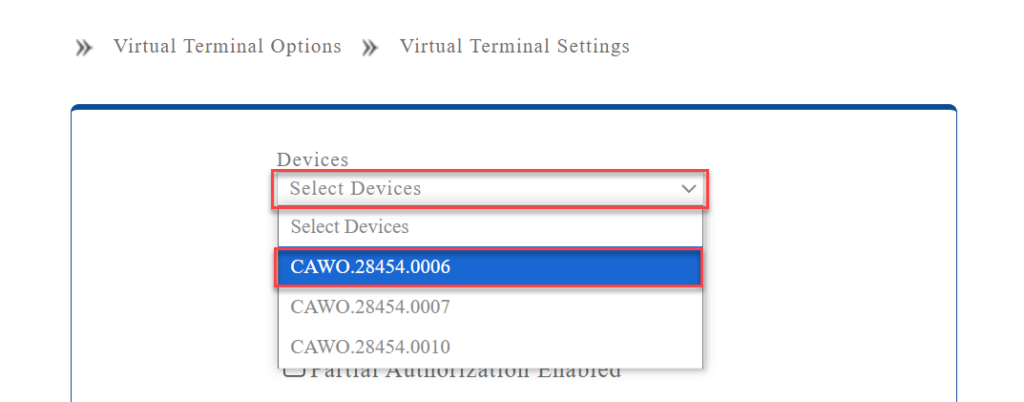
2. Device-Specific Settings
- Devices Dropdown: Select the specific terminal/device for which you want to configure settings. If there are multiple terminals, each terminal can have unique settings.
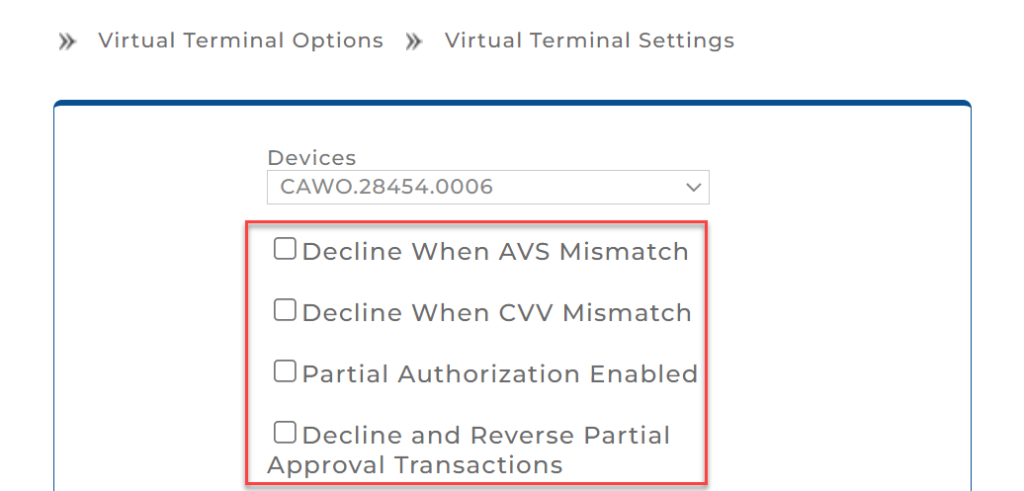
3. Transaction Configuration
- Decline When AVS Mismatch: Enable this option to decline transactions where the address does not match the billing address on the card (Address Verification System).
- Decline When CVV Mismatch: Enable this option to decline transactions where the CVV code does not match the one on file.
- Partial Authorization Enabled: Allows partial payments if the full amount cannot be authorized.
- Decline and Reverse Partial Approval Transactions: Automatically declines transactions where only partial approvals are given.
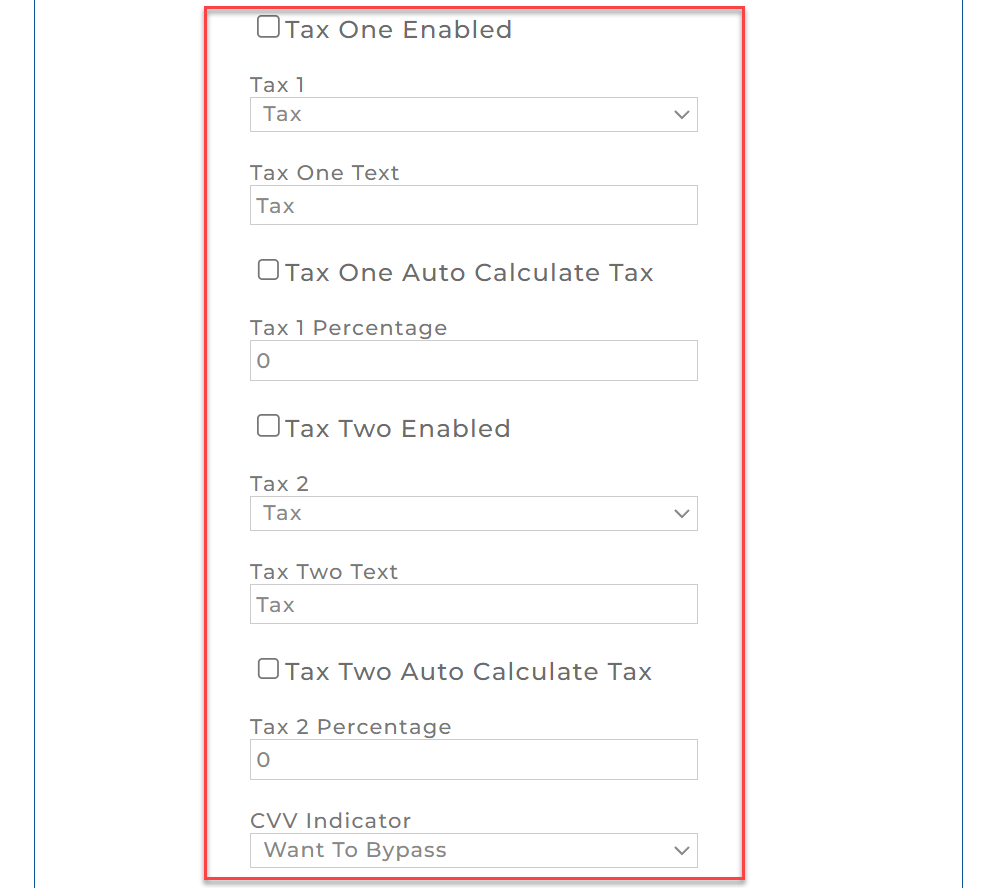
4. Tax Configuration
- Tax One Enabled: Enables the primary tax configuration for transactions.
- Tax 1: Check this box to enable the primary tax calculation for transactions.
- Tax: A generic term for general sales tax.
- IVA: This is a value-added tax.
- INC: Represents income tax.
- City: Tax levied by local city governments.
- State: State-level tax.
- ITBIS: Tax on the transfer of industrialized goods and services.
- OTROS: A generic term for other taxes that may be applied.
- Tax One Text: Input the label or name for this tax (e.g., “Sales Tax”).
- Tax One Auto Calculate Tax: Automatically calculates this tax based on the percentage entered.
- Tax One Percentage: Enter the percentage for the tax (e.g., 7%).
- Tax 1: Check this box to enable the primary tax calculation for transactions.
- Tax Two Enabled: Enables a secondary tax option for transactions.
- Tax 2: Check this box to enable the secondary tax calculation for transactions.
- Tax Two Text: Input the label or name for this tax.
- Tax Two Auto Calculate Tax: Automatically calculates the secondary tax.
- Tax Two Percentage: Input the percentage for the secondary tax.
- CVV: Option to describe the status or handling of the CVV (Card Verification Value) during a transaction.
- Want To Bypass: Select this option if you wish to skip the CVV verification process for the transaction.
- Value Illegible: Use this option when the CVV on the card is present but cannot be read due to damage or wear.
- Not On Card: Choose this option if the card does not have a CVV printed on it, which can happen with some types of cards.
- Enter CVV: This option indicates that the CVV is present and should be entered as part of the transaction for validation purposes.
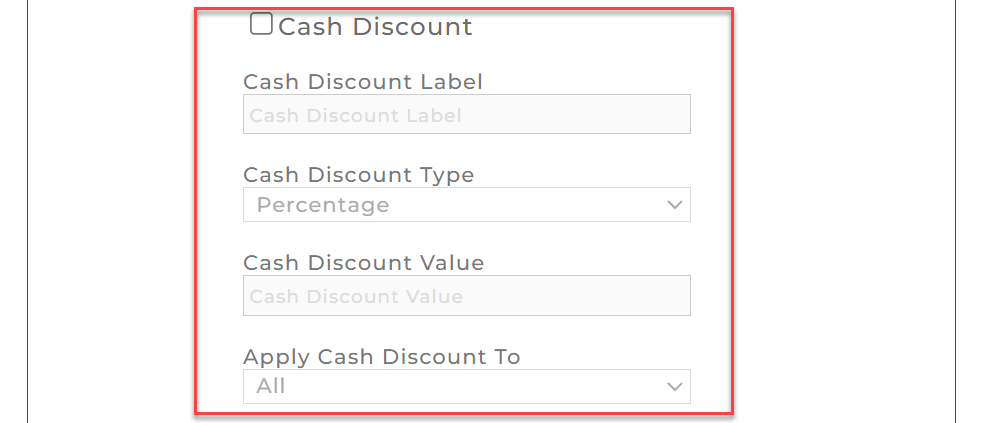
5. Cash Discount Configuration
- Cash Discount: Enables discounts for cash transactions.
- Cash Discount Label: Specify the label for the cash discount.
- Cash Discount Type: Select the type of discount, either percentage or amount.
- Cash Discount Value: Input the discount percentage or amount.
- Apply Cash Discount To: Set the discount to apply either to all transactions or specific transactions such as credit or ACH.
6. Display Fields Configuration
- Show Customer Number: Displays the customer’s number on the screen during transactions.
- Show Invoice Number: Displays the invoice number during the transaction.
- Show Clerk Number: Displays the clerk’s number or ID for reference during the transaction.
- Enable BIN Lookup: This option becomes available when Cash Discount is selected in the Virtual Terminal settings. It allows the system to perform a BIN (Bank Identification Number) lookup during transactions.
Note: When Cash Discount is not selected, this option is not visible in the settings.

7. Save Settings
- Update: Saves the configuration.
- Clear: Resets the receipt configuration back to previously saved values.

Configuring Virtual Terminal Receipts
Virtual Terminal Receipts allow merchants to customize receipts for each transaction. To configure receipts, follow these steps:
1. Accessing Receipt Configuration
- From the Virtual Terminal Options dropdown, select Virtual Terminal Receipts.
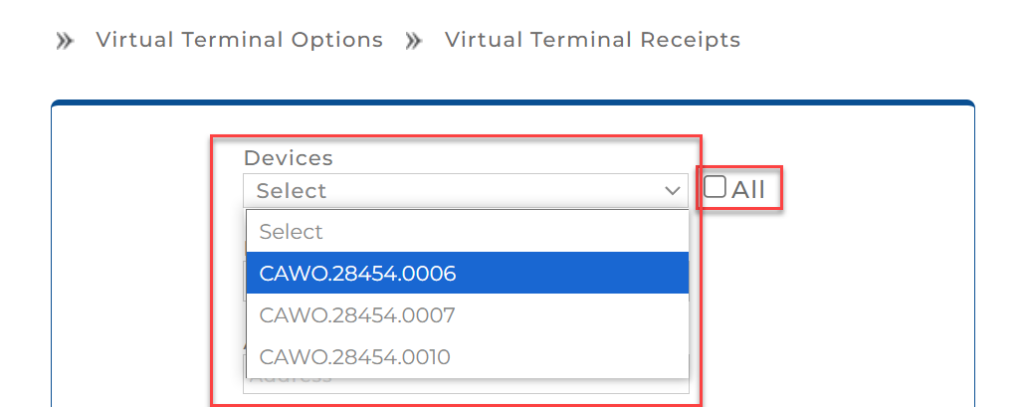
2. Device-Specific Receipt Configuration
- Devices Dropdown: Select the device you want to configure receipts for. If multiple devices are present, you can configure each terminal individually or apply the settings to All.
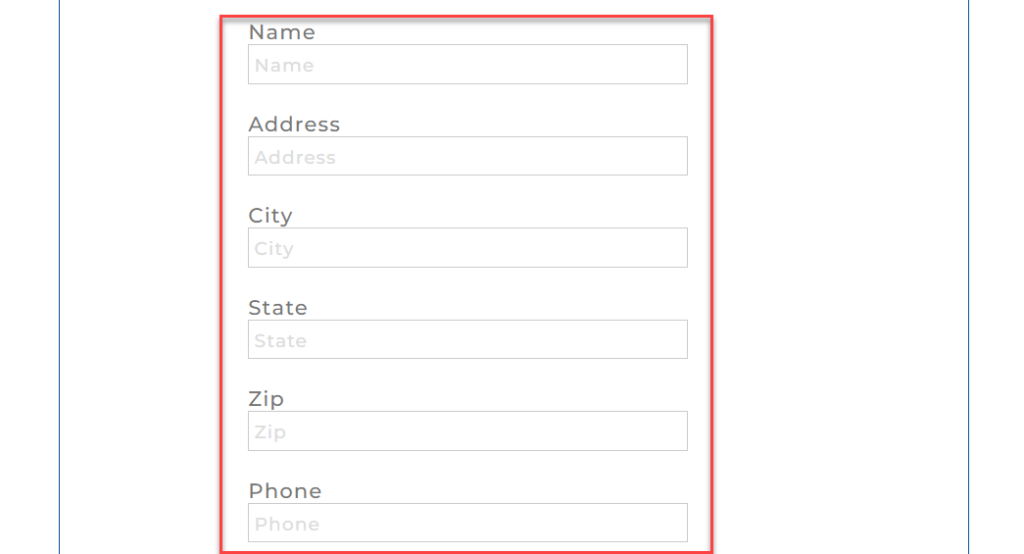
3. Merchant Information
- Name: Enter the merchant’s name to appear on the receipt.
- Address, City, State, Zip, Phone: Enter the merchant’s contact information.
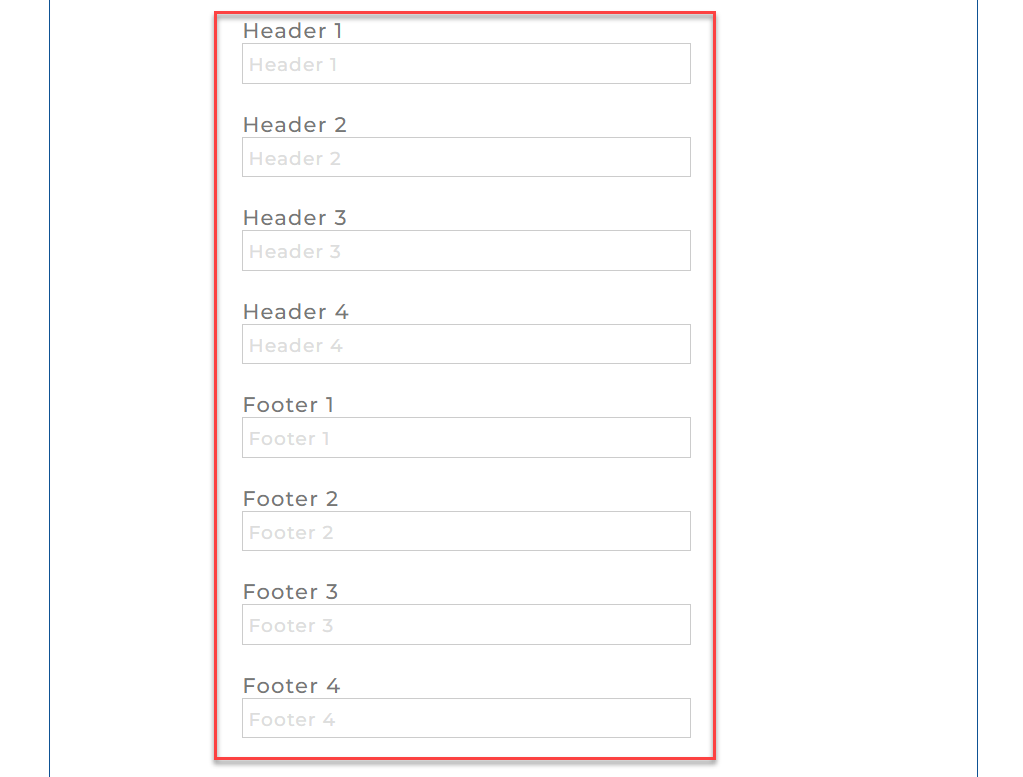
4. Custom Headers and Footers
- Header Fields (1-4): Enter custom text for up to four lines at the top of the receipt (e.g., “Thank you for your business!”).
- Footer Fields (1-4): Enter custom text for up to four lines at the bottom of the receipt (e.g., “Visit us again!”).
5. Save or Reset Receipt Settings
- Update: Saves the receipt configuration.
- Clear: Resets the receipt configuration back to default values.

Processing Transactions Using Virtual Terminal
To process a transaction using Virtual Terminal, follow these steps:
Step 1: Accessing Virtual Terminal
- From the Virtual Terminal Options menu, select Virtual Terminal.
Step 2: Select Device and Payment Type
- Devices Dropdown: Select the terminal you are using for the transaction.
- Payment Type: Select Credit, Gift Card, Cash, or Check Card depending on the method of payment.
Note: Each merchant may be set up with a different variety of Payment Types based on their customer base. The most common is Credit.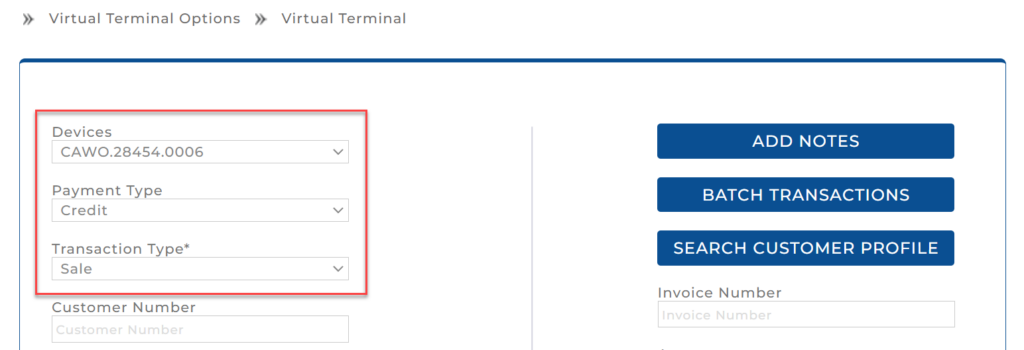
- Transaction Type: Select Sale from the Transaction Type dropdown.
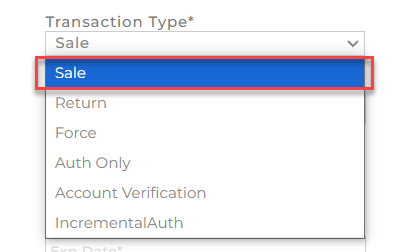
Note: Other types of transactions available may include:
- Return: This transaction allows a merchant to reverse a completed Sale if the cardholder decides to cancel the purchase.
- Auth Only: This transaction confirms that funds are available on the card for a future Sale without completing the transaction.
- Force (Force Capture): This completes a Sale after a prior Auth Only, where both merchant and cardholder agree to finalize the purchase.
- Account Verification: This transaction verifies the validity of a card without deducting any funds or reserving any amount.
- Incremental Auth: This allows a merchant to add additional funds to an existing Auth Only if the initial amount is insufficient.
Step 3: Using Customer Profiles to Autofill Transaction Details
Instead of manually filling out the transaction form, you can select a customer profile to automatically populate the required fields.
Steps to Use Customer Profiles:
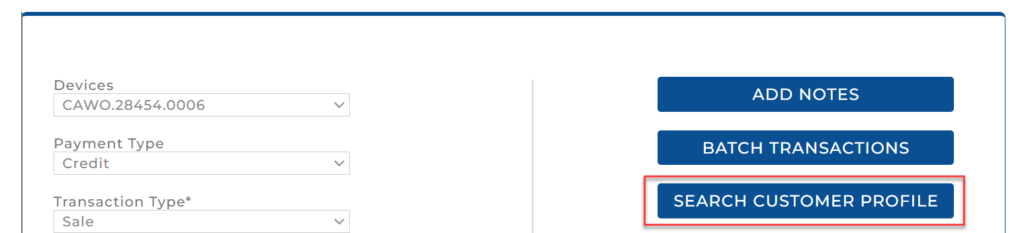
- Search Customer Profile: Click the Search Customer Profile button.
- Search or Select Customer: In the customer profile search popup, you can either:
- Use the search bar to find a specific customer by their customer number.
- Browse the list and select the desired customer from the table.
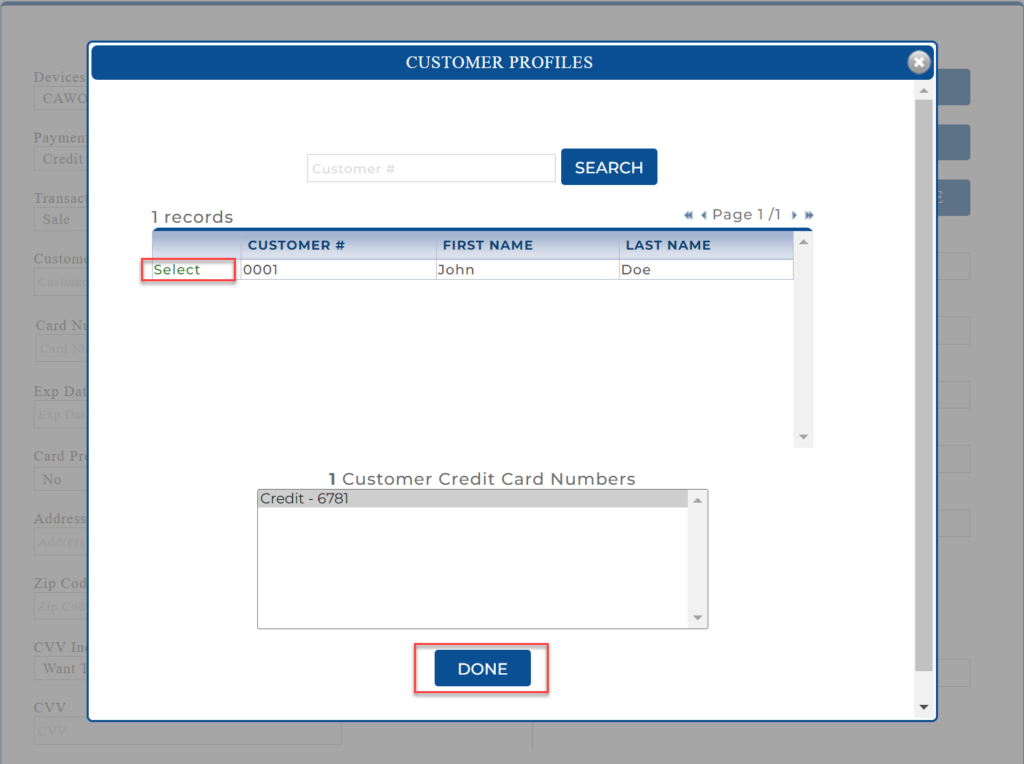
- Autofill Transaction Form: Once you select the customer, the form will automatically populate with the customer’s details (such as card number, expiration date, address, etc.).
- Review Information: Ensure the details populated from the customer profile are correct, especially the amount field if the transaction involves specific pricing.
- Process the Transaction: Click Process to complete the transaction with the pre-filled details.
Note: Refer to the Customer Import Specifications guide to add customers to the Customer Vault.
Step 4: Manually Filling Transaction Form (If Customer Profile is not used)
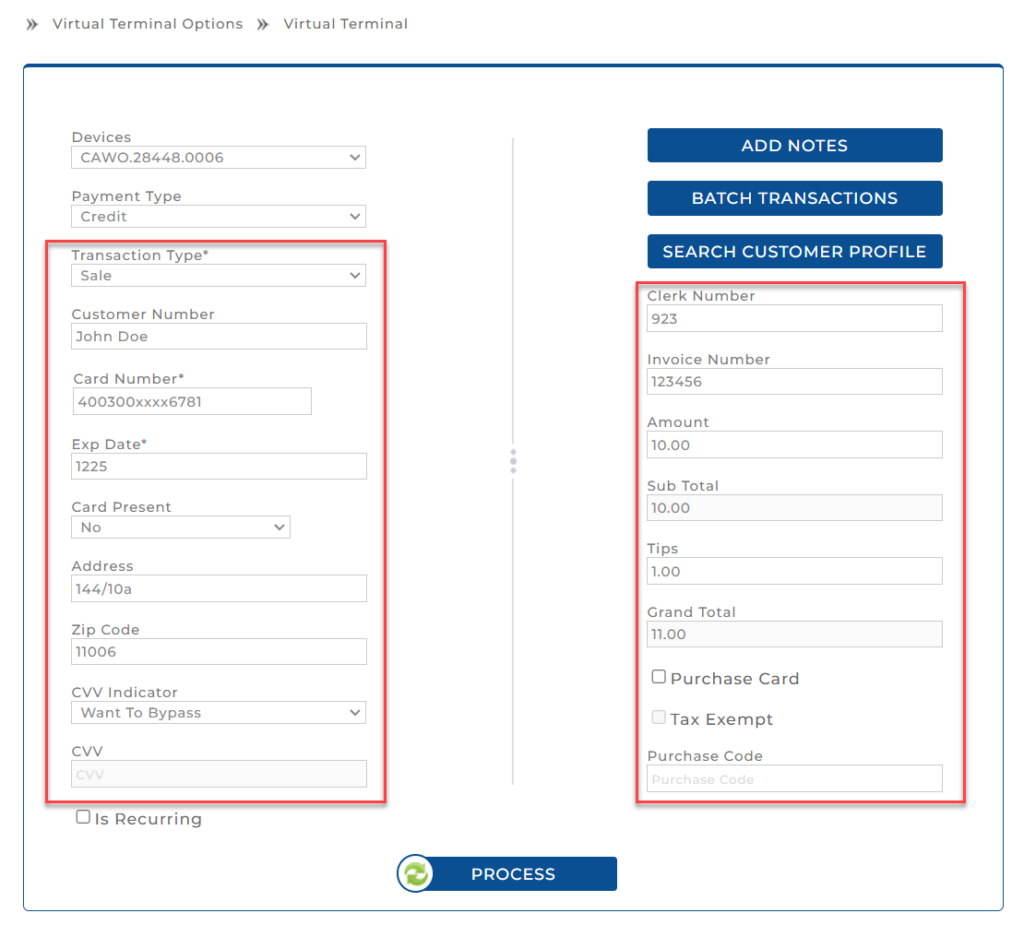
- Transaction Type: Choose the type of transaction (e.g., Sale, Return, Force, Auth Only, Account Verification).
- Customer Number: Optionally, input the customer’s number for profile-based transactions.
- Card Number: Enter the card number manually, or if your Virtual Terminal is set up to support a card reader, run the card present transaction through the reader.
- Exp Date: Input the card’s expiration date.
- Card Present: Choose whether the card is physically present (swiped) or not.
- Address & Zip Code: Optionally, input the billing address and zip code for verification.
- CVV Indicator: Choose whether to verify the CVV or bypass it.
- CVV: If the CVV Indicator is set to Enter CVV and the card is being manually entered, enter the CVV code from the card in this field.
- Clerk Number: Enter the clerk number for the clerk processing the transaction.
- Invoice Number: Enter the invoice number associated with the transaction.
- Amount: Enter the amount for the transaction.
- Subtotal and Tips: Enter any tip amount if applicable.
- Grand Total: Review the total amount before processing.
- Purchase Card: Select this option if the transaction is being processed with a purchase card.
- Tax Exempt: Check this box if the customer or the transaction qualifies for tax exemption.
- Purchase Code: This field allows you to enter a specific code related to the purchase.
Step 5: Enable Recurring Payments
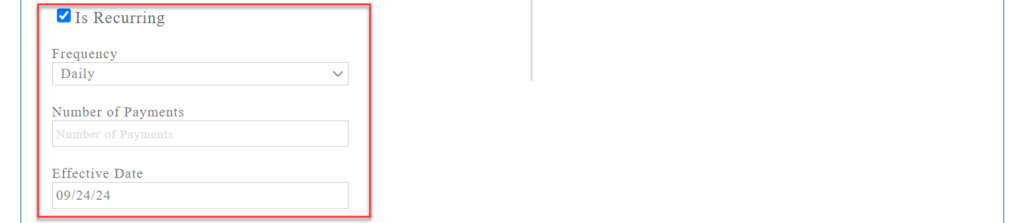
- Is Recurring: Select the Is Recurring checkbox if the payment needs to recur on a scheduled basis.
- Dropdown Menu: You can choose how often the payment will recur. The options available are:
- Daily: The payment will occur every day.
- Weekly: The payment will occur once per week.
- Bi-Weekly: The payment will occur once every two weeks.
- Monthly: The payment will occur once per month.
- Yearly: The payment will occur once per year.
- Quarterly: The payment will occur once every three months.
- Semi-Annually: The payment will occur once every six months.
- Number of Payments Field: Enter the total number of recurring payments that should be made. For example, if the customer is to be charged monthly for 12 months, enter 12.
- Effective Date Field: This field will display the date when the recurring payments will begin. The default value is the current date, but you can modify this to set a future start date if necessary.
Step 6: Process the Transaction
- Review the transaction details.
- Click Process to complete the transaction.

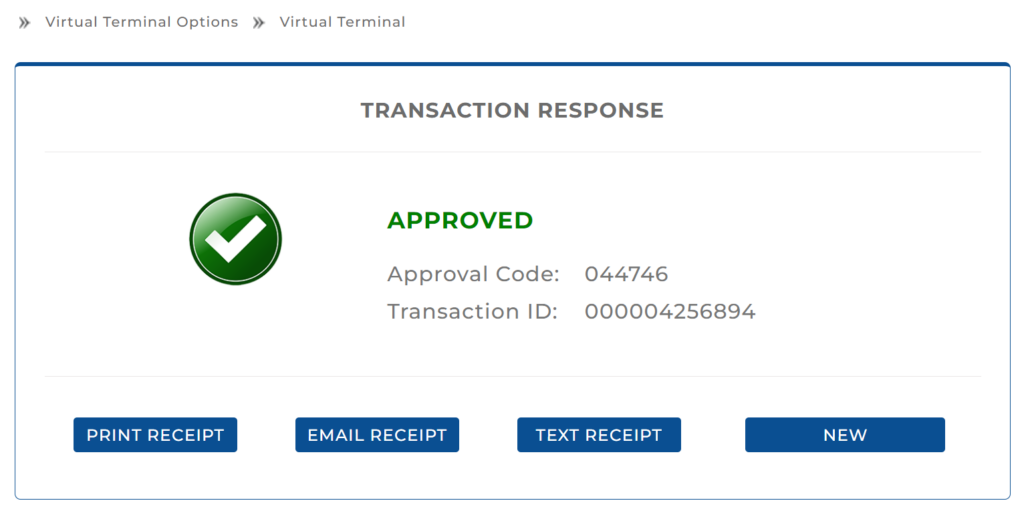
Step 7: Transaction Completion Response Screen
Once a transaction is successfully processed, the following response screen will be displayed:
- Status: Shows APPROVED if the payment is successfully processed.
- Approval Code: Unique code associated with the transaction approval.
- Transaction ID: Unique identifier for the transaction.
- Action Buttons:
- Print Receipt: Allows printing a physical copy of the receipt.
- Email Receipt: Enables sending a digital copy of the receipt to the customer’s email.
- Text Receipt: Allows sending the receipt to the customer’s mobile via SMS.
- New: Resets the form for a new transaction.
How to Use This Screen
- Review the Status: Ensure the transaction has been successfully processed.
- Choose a Receipt Option: Print, email, or text the receipt based on the customer’s preference.
- New: Start a new transaction if needed.
Subscribe to Documentation Updates
Receive a monthly summary of new and updated technical documents.