Introduction
The PaymentModule iOS SDK allows developers to integrate payment functionalities into their applications. This document provides step-by-step guidance for integrating the SDK into Objective-C and Swift projects, configuring necessary dependencies, handling transactions, and managing device connectivity.
Supported Devices
The SDK supports the following payment terminal devices:
- Datecs:
- BlueLite: BlueLite V2
- BluPad: BluPad-50 Plus
- Miura:
- Miura V3-3
Integration Steps
1. Add SDK Framework and Resource Bundle
- Add
paymentmodule.frameworkandpaymentmoduleresources.bundleto the framework folder in your application. - Set the Do Not Embed option for the framework.
- Ensure the following folder structure:
- Frameworks:
Target > General > Frameworks, Libraries, and Embedded Content - Bundles:
Target > Build Phases > Copy Bundle Resource
- Frameworks:
Note: Ensure the paymentmoduleresources.bundle file is added correctly to avoid runtime issues.
2. Import Required Headers
You must add the following import statements:
For Objective-C
In the .h file:
#import <UIKit/UIKit.h>
#import <paymentmodule/PeripheralDeviceDelegate.h>
#import <paymentmodule/EMVData.h>
#import <paymentmodule/TrackData.h>
#import <paymentmodule/PaymentServiceTransaction.h>
#import <paymentmodule/PaymentService.h>
In the .m file:
#import <objc/runtime.h>
#import <paymentmodule/paymentmodule.h>
For Swift
You must add the following import statements in your Swift files:
import UIKit
import paymentmodule
The paymentmodule.framework automatically includes the necessary classes such as:
- PeripheralDeviceDelegate
- EMVData
- TrackData
- PaymentServiceTransaction
- PaymentService
Note: Make sure the paymentmodule.framework and paymentmoduleresources.bundle are correctly added to the project.
If using Objective-C alongside Swift, create a Bridging Header (for example, ProjectName-Bridging-Header.h) and import the necessary Objective-C headers there:
#import <paymentmodule/PeripheralDeviceDelegate.h>
#import <paymentmodule/EMVData.h>
#import <paymentmodule/TrackData.h>
#import <paymentmodule/PaymentServiceTransaction.h>
#import <paymentmodule/PaymentService.h>
#import <objc/runtime.h>
Swift Compiler Settings
Ensure that:
- Swift Language Version is correctly set in Build Settings.
- Objective-C Bridging Header is specified if both languages are used.
3. Add Required Apple Frameworks
Include the following frameworks:
- AVFoundation
- UIKit
- Foundation
- CoreLocation
- CoreAudio
- CoreAudioKit
- CoreBluetooth
- AudioToolbox
- CoreData
- CoreGraphics
- ExternalAccessory
- MediaPlayer
- Security
- libsqlite3
4. Add Payment Module Resource Bundle
Ensure that paymentmoduleresources.bundle is added to files shared with you for peripheral devices to fetch files and resources. Refer to the below image for better clarity:
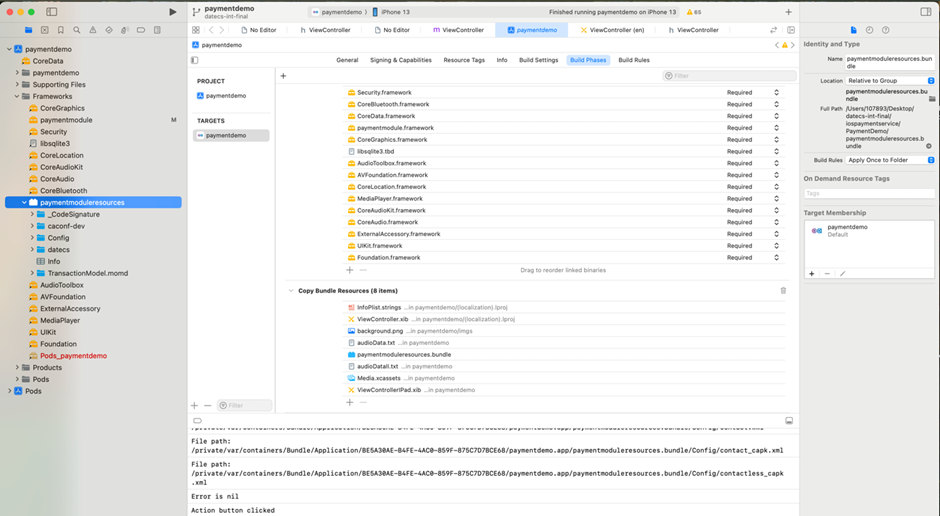
Note: Make sure paymentmoduleresources.bundle file is added to the following:
Target > Build Phases > Copy Bundle ResourcesThis bundle contains files required for peripheral device operations.
5. Update Info.plist for Bluetooth Permissions
Add the following entry in Info.plist for Bluetooth permissions:
<key>NSBluetoothAlwaysUsageDescription</key>
<string>This app uses Bluetooth to connect to nearby devices.</string>
6. Create a Bridging Header (Swift Projects Only)
If your project uses Swift, create a bridging header file named: ProjectName-Bridging-Header.h.
Software License and Device Registration
1. Choose Server Environment
The SDK supports test and production environments:
[Transaction useTestServer:true]; // Test server
[Transaction useTestServer:false]; // Production server
2. License Key Registration
- To check if already registered, call the following:
[RegistrationManager isRegistered];- To register a license key, call the following:
+(BOOL) registerWithLicenseNumber:(NSString*)licenseNumber
 phoneNumber:(NSString*)phoneNumber
 workstationId:(NSString*)workstationId
errorResponse:(NSString**)errResponse;- To unregister a license key, call the following:
+(BOOL) unregisterWithLicenseNumber:(NSString*)licenseNumber
 phoneNumber:(NSString*)phoneNumber
 workstationId:(NSString*)workstationId
 errorResponse:(NSString**)errResponse;
Device Connectivity
1. Connecting to a Datecs Device
- On clicking Connect, if the device is paired via Bluetooth, it appears in the following:
- (void)didReceiveSupportedAccessories:(NSDictionary *)accessories;- To establish a connection, call the following:
-(BOOL)connectToDevice:(NSString *)device;- SDK messages during the connection process are sent to the delegate method, as shown below:
-(void)updatingDevice:(NSString*)msg;Common Messages during Connection:
CHECK_P2PE_STATUSCHECKING_OS_MPIUPDATE_OS_MSGUPDATING_OS_FILESRKI_SUCCEEDED / RKI_FAILEDUNABLE_TO_CONNECTREMOVE_ALERT
Note: REMOVE_ALERT indicates completion.
2. Disconnect a Device
To disconnect a device, call the following:
[self._paymentService disconnectDevice];Transaction Handling
1. Initialize Payment Service
In viewDidLoad, call the following:
self._paymentService = [[PaymentService alloc] init];
self._paymentService._delegate = self;
2. Set Tender Type
To retrieve available tender types, call the following:
[self._paymentService getTenderTypes];Tender Type Values
| Tender Type | Value |
| ACH | 1 |
| CASH | 2 |
| CHECK | 3 |
| CREDIT | 4 |
| GIFT | 5 |
| DEBIT | 6 |
| EBT CASH | 7 |
| EBT FOODSTAMP | 8 |
3. Get Transaction Type
To get the transaction type based on the selection of tender type, call the following:
[[self._paymentService getTransactionTypesForTenderType:selectedTenderType] mutableCopy];Transaction Type Values:
| Transaction Type | Value | Notes |
| Sale/Purchase | Sale | Applicable to all tender types. |
| Authorize Only | Auth Only | Used to return batch details of an open batch, approved non-reversed transactions, and their totals. |
| Refund/Return | Return | Allows reversing a Sale, Auth Only, Force, and Return transactions. |
| Cancellation/Reversal | Reversal | Allows reversing a Sale, Auth Only, Force, and Return transactions. |
| Auth Completion | Force | Applicable to Credit transactions only. Enables forcing a previously authorized transaction by referencing an Auth Only or a Voice Authorization. A Force can also be used to provide a new Total Amount for Tip Editing. |
| Account Verification | AVS Only | Used for account verification. |
| Tip Capture/Edit | Tip Capture/Edit | Allows capturing and editing a Tip. |
4. Set Transaction Amounts
To perform the transaction, set the transaction._saleAmount before processing the transaction.
self._transaction._saleAmount = [saleAmtTextField text];
[self._transaction setAmountssaleAmt:@"100" tax:@"10" tip:@"5" cashback:@"0" serviceFee:@"2"];
Required Fields:
_tenderType_txnType_cardNumber_expDate_fullName
5. Process the Transaction
To process the transaction call the following:
[self._paymentService process:self._transaction];Delegate Methods:
- (void)transactionDidStart;
- (void)transactionDidComplete:(NSDictionary*)response;
- (void)transactionDidFailWithError:(NSError*)error;
Additional Methods
- Start Connection:
-(void)startConnection;- Search for Devices:
-(void)searchForDevicesForAccessory:(NSString*)accessory;- Abort Connection:
-(void)abortConnectingToDevice;- Update Device Configuration:
[self._paymentService updateDeviceConfig];- Update Device OS:
[self._paymentService updateDeviceOS];- Perform RKI:
[self._paymentService performRKI];- Update Device PI:
[self._paymentService updateDevicePI];PaymentModule iOS SDK Demo File
Conclusion
This document provides a structured guide for integrating the PaymentModule iOS SDK. For more details, you can refer to the sample iOS PaymentModule SDK demo application. By following these steps, you can successfully integrate the PaymentModule iOS SDK into your application. Ensure all required permissions, frameworks, and configurations are correctly applied for seamless operation.
Subscribe to Documentation Updates
Receive a monthly summary of new and updated technical documents.