1. Overview
This guide provides a comprehensive walkthrough on setting up and integrating a payment form in Charge Anywhere. It covers the configuration of payment form settings, generating payment form code, and processing transactions based on the updated UI.
2. Prerequisites
- You must have access to Transaction Manager with valid login credentials.
- If you do not have login credentials for Transaction Manager, please email the support team
support@chargeanywhere.comto request access.
3. Login URL
Test URL: https://sandbox.chargeanywhere.com/TransactionManager/Login.aspx
Production URL: https://www.chargeanywhere.com/transactionmanager/login.aspx
4. Initial Setup
Before integrating Payment Forms into a merchant’s website, follow these steps:
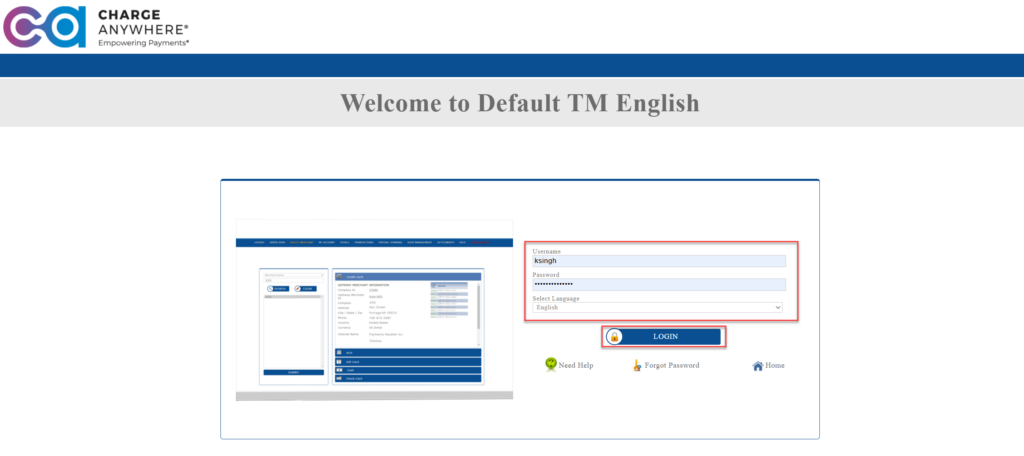
4.1 Login to Transaction Manager
- Navigate to the Transaction Manager login page.
- Enter your username and password in the respective fields.
- Click the Login button to access your dashboard.
4.2 Accessing Payment Form Setup
1. After you are logged into Transaction Manager, navigate to Virtual Terminal > Payment Forms > Payment Form Setup.
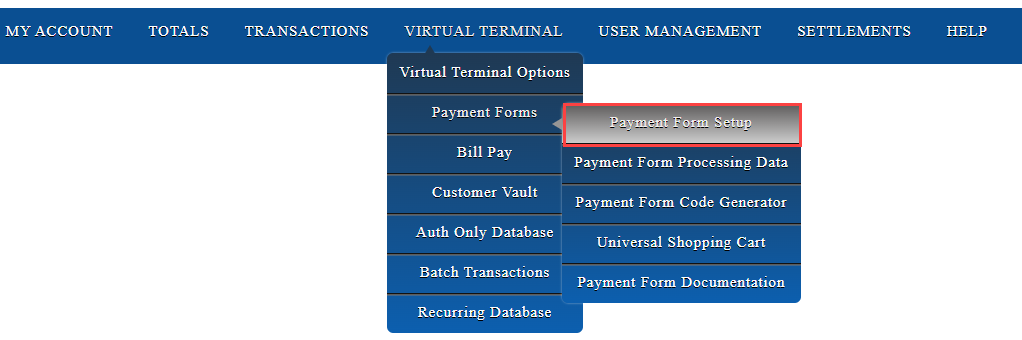
The Payment Form Setup page opens, allowing customization of payment forms.
5. Configuring the Payment Form
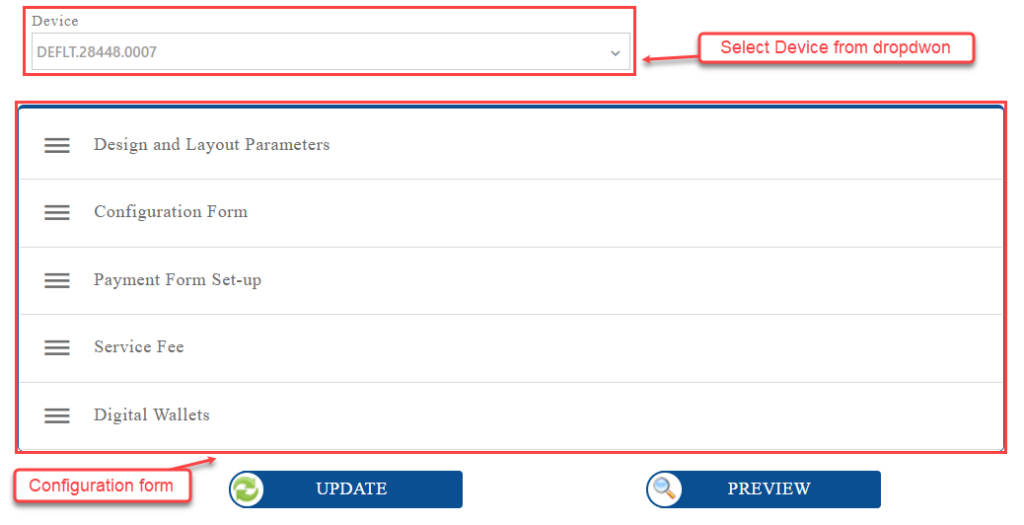
The Payment Form Setup page consists of several sections for customization:
5.1 Select Device
- Click the Device dropdown field.
- Select the required device from the list. The selected device will be displayed in the field.
- Ensure the correct device is selected before proceeding with the payment form configuration.

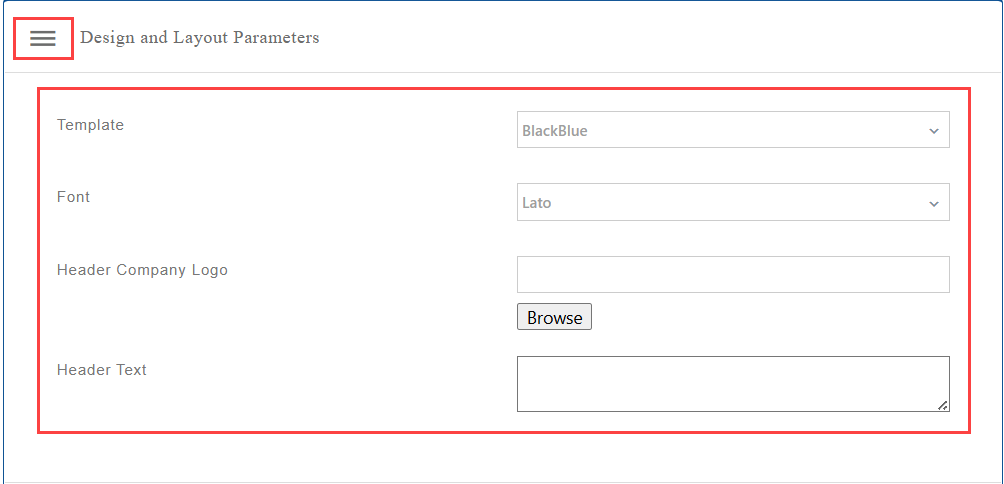
5.2 Design and Layout Parameters
The Design and Layout Parameters section allows merchants to customize the appearance of their payment form, including the template, font, and branding elements.
Field Descriptions
- Template: Select a predefined template for the payment form (e.g., BlackBlue).
- Font: Choose a preferred font style for text display (e.g., Lato).
- Header Company Logo: (Optional) Upload a company logo to display in the payment form header.
- Header Text: Enter a custom text to be displayed in the payment form header.
Steps to Configure Design and Layout
- Navigate to the Design and Layout Parameters section.
- Click the hamburger icon to expand the Design and Layout Parameters section.
- Select a Template from the dropdown to define the form’s appearance.
- Choose a Font style that aligns with your branding.
- (Optional) Click Browse under Header Company Logo to upload an image file.
- Enter Header Text if you want to display a custom message.
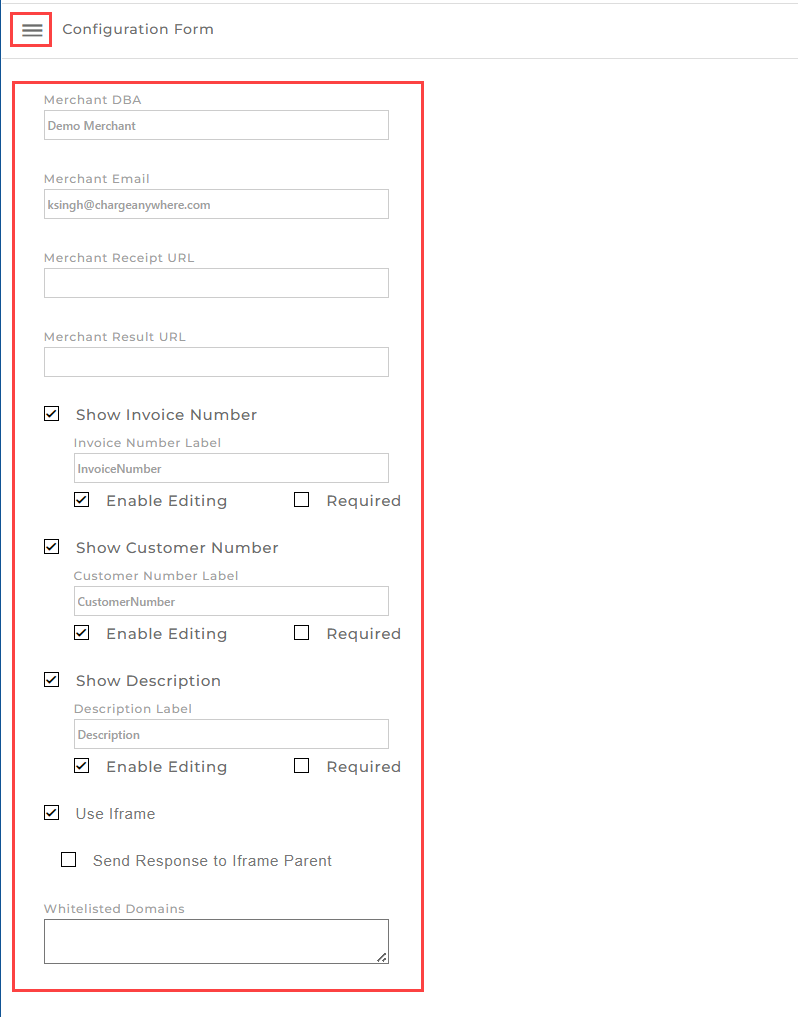
5.3 Configuration Form
The Configuration Form allows merchants to customize payment form settings, including required fields and display preferences.
Field Descriptions
- Merchant DBA: Displays the registered merchant name.
- Merchant Email: Displays the merchant’s registered email.
- Merchant Receipt URL: (Optional) Enter the URL where customers can access their transaction receipt.
- Merchant Result URL: (Optional) Enter the URL to receive payment result updates.
- Show Invoice Number:
- Check to enable the invoice number field on the payment form.
- Invoice Number Label: Customize the field label.
- Enable Editing: Allow users to modify the invoice number.
- Required: Mark the field as mandatory.
- Show Customer Number:
- Check to enable the customer number field.
- Customer Number Label: Customize the field label.
- Enable Editing: Allow users to modify the customer number.
- Required: Mark the field as mandatory.
- Show Description:
- Check to enable the description field.
- Description Label: Customize the field label.
- Enable Editing: Allow users to modify the description.
- Required: Mark the field as mandatory.
- Use Iframe: Embeds the form in an iframe for seamless integration.
- Send Response to Iframe Parent: Enables response communication with the parent window when using an iframe.
- Whitelisted Domains: Specify the domains allowed to access the payment form for security purposes.
Steps to Configure the Payment Form
- Navigate to the Configuration Form section.
- Click the hamburger icon to expand the Configuration Form section.
- Fill in or modify the Merchant DBA, Merchant Email, and optional receipt/result URLs.
- Enable or disable fields such as Invoice Number, Customer Number, and Description based on your requirements.
- Customize labels, allow editing, and mark fields as Required if needed.
- If using an iframe, check the Use Iframe option and configure domain whitelisting.
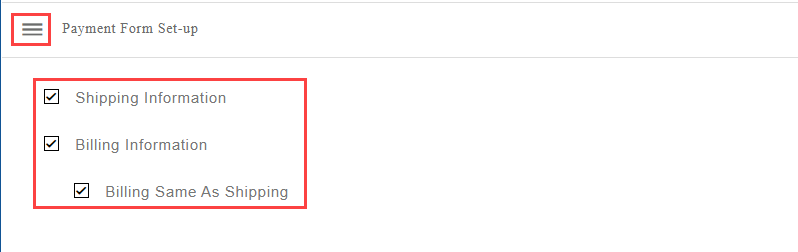
5.4 Payment Form Setup
The Payment Form Setup section allows merchants to configure the collection of shipping and billing details during checkout.
Field Descriptions
- Shipping Information: Check this option to enable the collection of shipping details.
- Billing Information: Check this option to enable the collection of billing details.
- Billing Same as Shipping: Check this option to auto-fill billing details using the shipping information, reducing manual input.
Steps to Configure Payment Form Setup
- Navigate to the Payment Form Setup section.
- Check Shipping Information if you need to collect customer shipping details.
- Check Billing Information if billing details are required separately.
- If billing and shipping details are the same, check Billing Same as Shipping to autofill billing information.
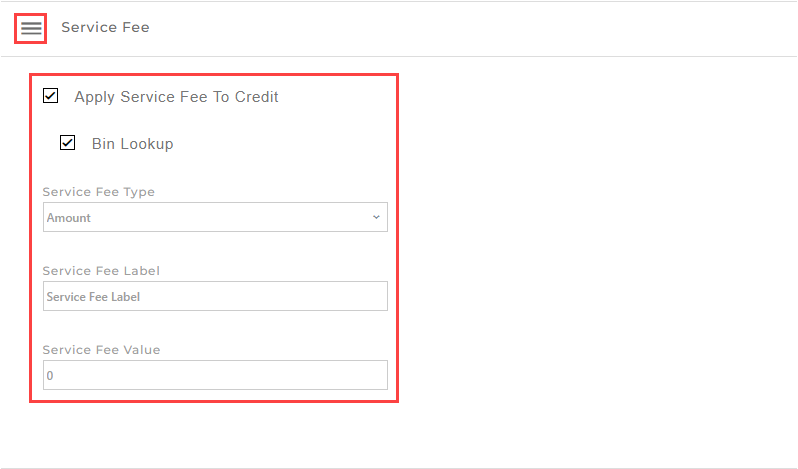
5.5 Service Fee
The Service Fee section allows merchants to configure additional charges applied to credit transactions.
Field Descriptions
- Apply Service Fee to Credit: Check this option to apply a service fee on credit transactions.
- Bin Lookup: Enable BIN (Bank Identification Number) lookup functionality to determine applicable service fees based on the card type.
- Service Fee Type: Choose the type of service fee:
- Amount: A fixed fee per transaction.
- Percentage: A fee calculated based on a percentage of the transaction amount.
- Service Fee Label: Customize the label that appears for the service fee on the payment form.
- Service Fee Value: Enter the fee amount or percentage to be applied to transactions.
Steps to Configure Service Fee
- Navigate to the Service Fee section.
- Check Apply Service Fee to Credit to enable additional charges for credit transactions.
- (Optional) Enable Bin Lookup to apply fees based on card type.
- Select the Service Fee Type from the dropdown (Amount or Percentage).
- Enter a custom Service Fee Label if needed.
- Specify the Service Fee Value (fixed amount or percentage).
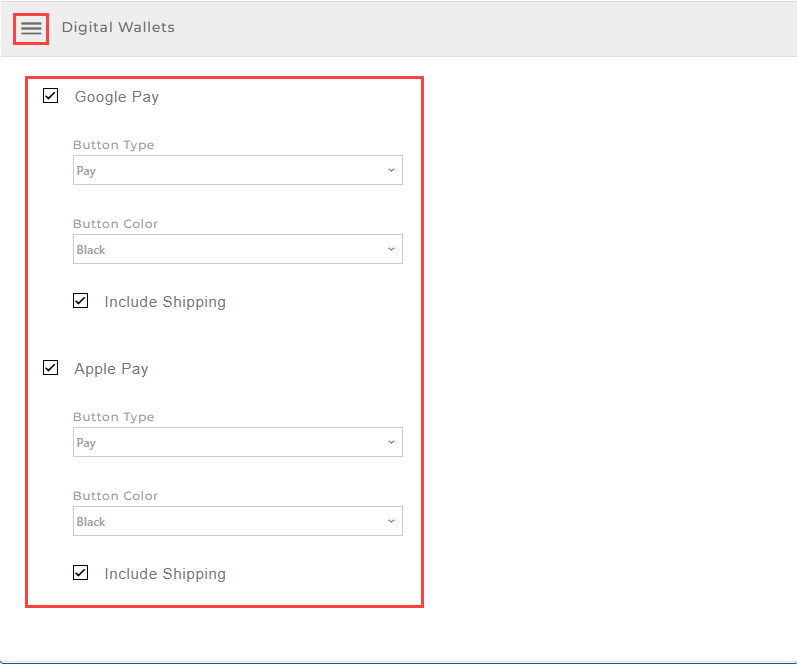
5.6 Digital Wallets
The Digital Wallets section allows merchants to enable and configure Google Pay and Apple Pay for seamless transactions.
Field Descriptions
- Google Pay: Check to enable Google Pay as a payment option.
- Apple Pay: Check to enable Apple Pay as a payment option.
- Button Type: Select the button type from the dropdown (e.g., Pay).
- Button Color: Choose a button color for the payment method (e.g., Black).
- Include Shipping: Check to include shipping details in the transaction.
Steps to Configure Digital Wallets
- Navigate to the Digital Wallets section.
- Check Google Pay to enable it for payments.
- Check Apple Pay to enable it for payments.
- Select the Button Type (Pay or Donate) for each digital wallet.
- Choose a Button Color that fits the design preferences.
- Check Include Shipping to add shipping details to the transaction if needed.
5.7 Update and Preview
After configuring the payment form, you can either Update or Preview to review the changes.
Steps:
- Click Update: After making any changes to the payment form, click Update to save those changes. A confirmation message will appear at the top in green, indicating that the “Payment form saved successfully.”
- Click Preview: If you’d like to see how the form looks before going live, click Preview. This will open a preview of the payment form where you can review the layout and ensure everything is displayed correctly.

Key Points:
- Clicking Update saves your settings and confirms the changes.
- Clicking Preview lets you see the final result of the payment form, including the merchant details and payment methods like Google Pay or Credit/Debit options, before the changes are finalized.
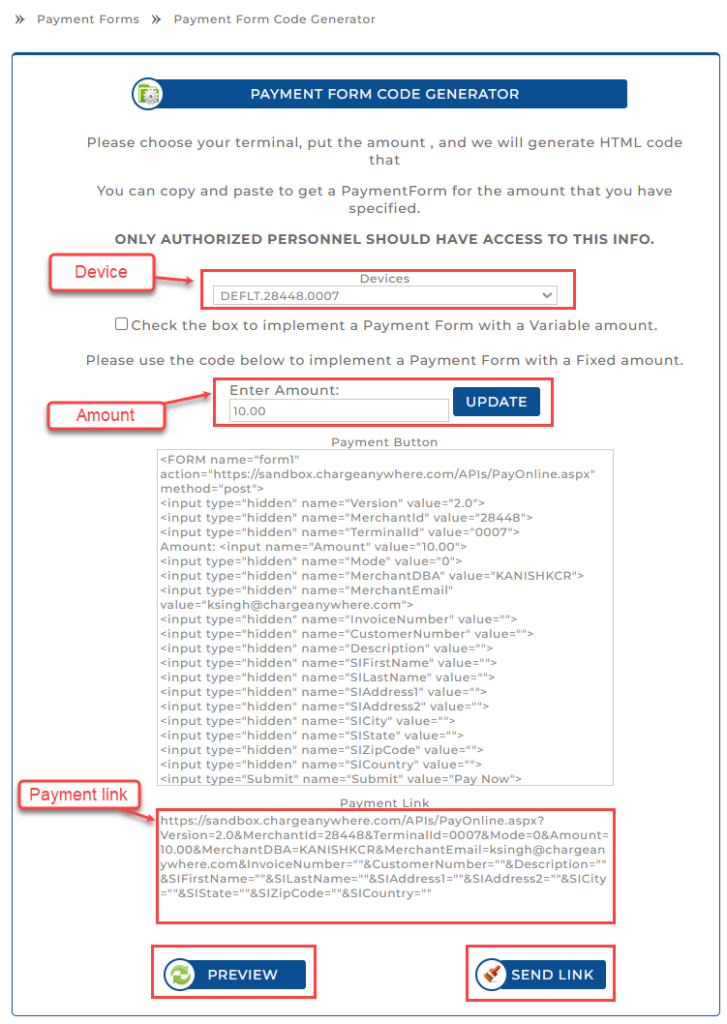
6. Generating the Payment Form Code
The Payment Form Code Generator allows merchants to create a payment form link or embed it as a button on a website.
Steps to Generate Payment Form Code
1. Navigate to Virtual Terminal > Payment Forms > Payment Form Code Generator.

2. Select the device from the Devices dropdown.
3. Enter the transaction amount in the Enter Amount field (e.g., $10.00).
4. Click Update to generate the payment form code.
Configuring the Payment Amount
- Enable Variable Amount (Checkbox Checked)
- The amount field becomes editable.
- Merchants or customers can enter a custom amount.
- Default value is 0.00 USD, allowing dynamic pricing.
- Enable Fixed Amount (Checkbox Unchecked)
- The amount is set to a predefined value (e.g., $10.00 USD).
- The field becomes non-editable, ensuring a fixed price per transaction.
Generated Output:
- HTML Payment Button Code: A form snippet that can be embedded into a website to display a payment button.
- Payment Link: A direct link that customers can use to access the payment form.
Additional Options:
- Click Preview to test how the payment form looks before implementation.
- Click Send Link to share the payment form link with customers.
7. Viewing the Payment Form
Once the payment form is generated, you can open the provided payment link in a web browser to review its layout and functionality.
Steps to View the Payment Form:
- Copy the generated Payment Link.
- Open a web browser and paste the link in the address bar.
- Press Enter to load the payment form.
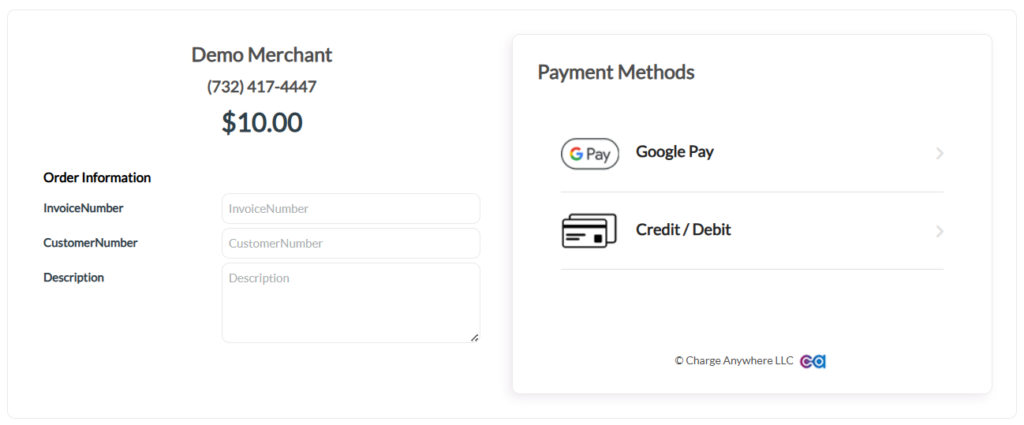
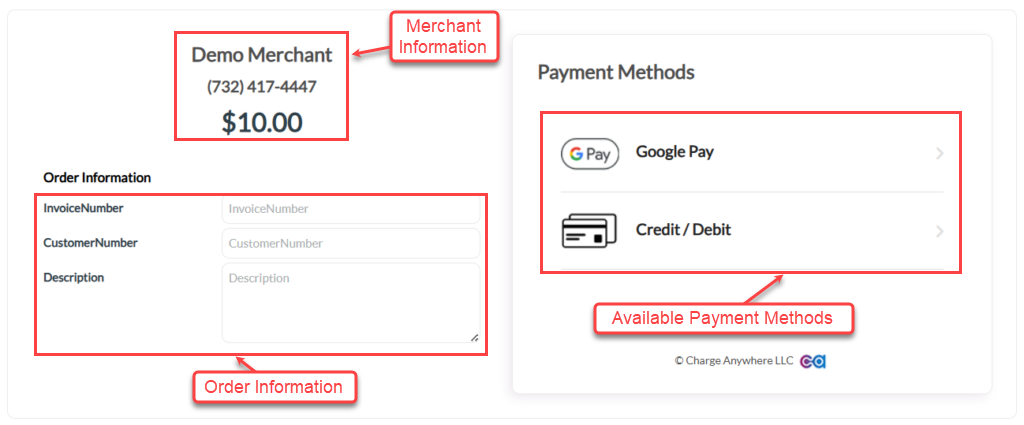
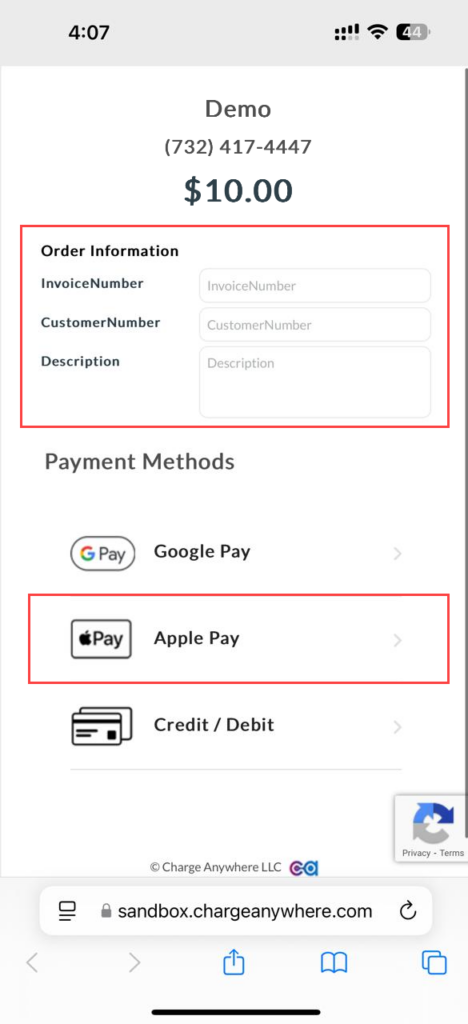
Payment Page Overview:
The payment form provides users with the necessary fields to complete a transaction. It includes the following sections:
Merchant Information
- Merchant Name: Displays the business name processing the payment (e.g., Demo Merchant).
- Phone Number: The contact number of the merchant (e.g., 732-417-4447).
- Payment Amount: Shows the total transaction amount (e.g., $10.00).
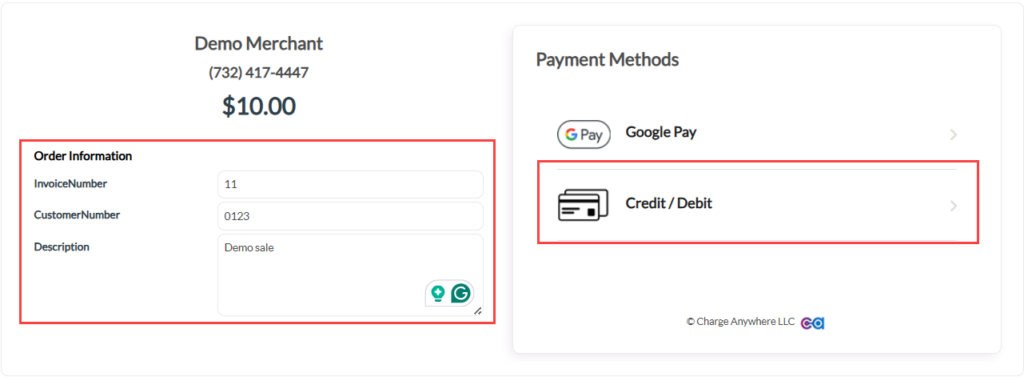
Order Information Fields
- Invoice Number: A unique identifier for the transaction.
- Customer Number: A reference number for the customer making the payment.
- Description: A text field to provide additional details about the transaction.
Available Payment Methods
- Google Pay: Allows customers to pay using their saved Google Pay wallet.
- Credit/Debit Cards: Enables payment via Visa, MasterCard, American Express, or Discover.
- Apple Pay: Allows customers to pay using their saved Apple Pay wallet.
Note: Apple Pay is available only on the Apple devices.
8. Making a Payment
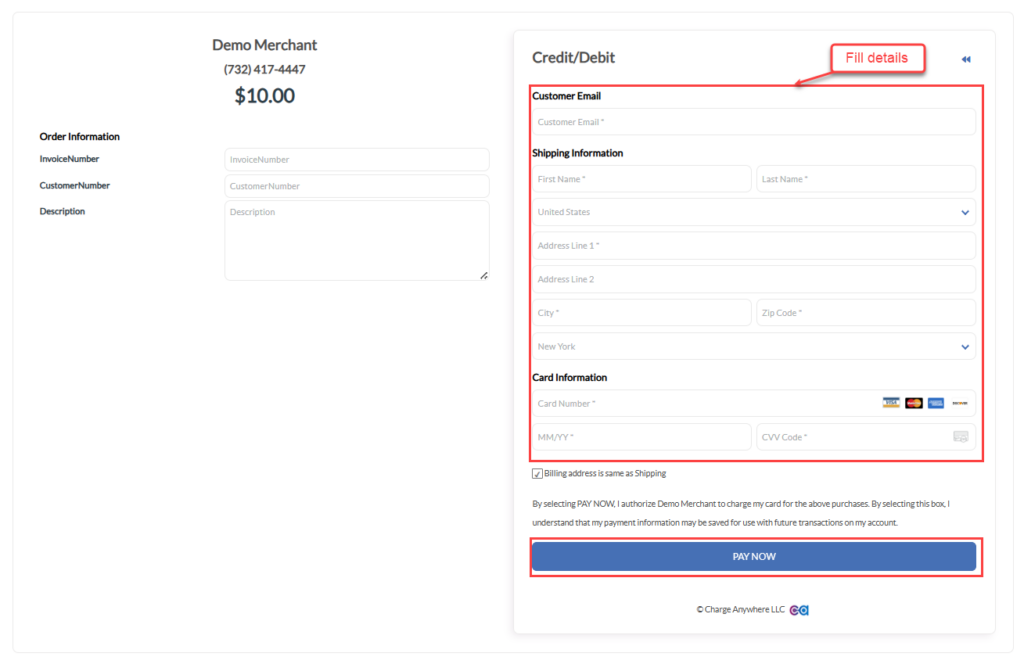
8.1.1 Credit/Debit Card Payment (Desktop View)
Steps to Process a Payment Using Credit/Debit Card on Desktop:
- Select the Credit/Debit payment option on the payment form.
- Enter the Order Information, if applicable:
- Invoice Number
- Customer Number
- Description
- Provide a valid email address in the Customer Email field.
- Provide Shipping Information
- Enter the following details:
- First Name and Last Name
- Address Line 1 (Required)
- Address Line 2 (Optional)
- City and Zip Code
- Country
- Enter the following details:
- Fill in Card Details
- Enter the following payment information:
- Card Number (Visa, MasterCard, American Express, Discover)
- Expiry Date (MM/YY)
- CVV Code (3-digit for most cards, 4-digit for American Express)
- Enter the following payment information:
- Billing Address Selection
- If the Billing address is the same as Shipping, check the box to autofill the shipping details as the billing address.
- If the Billing address is different, uncheck the box and manually enter the billing information:
- Cardholder Name (First and Last Name)
- Address Line 1 (Required)
- Address Line 2 (Optional)
- City and Zip Code
- Country
- Read the authorization statement regarding charges and saved payment details.
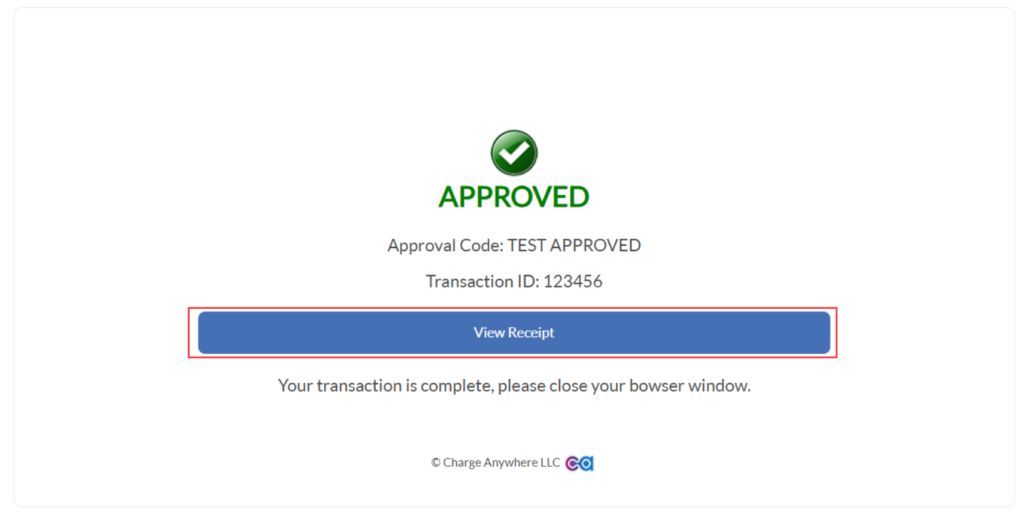
8. Transaction Approval Page
- If the payment is successful, an Approved message appears.
- The page displays the Approval Code and Transaction ID.
- Click View Receipt to access and download the payment receipt.
- A message confirms that the transaction is complete, and the user can close the browser window.
Upon successful payment, the transaction is completed, and a confirmation receipt is sent to the provided email. To learn more about payment receipts, refer to the Viewing and Managing Payment Receipt section.
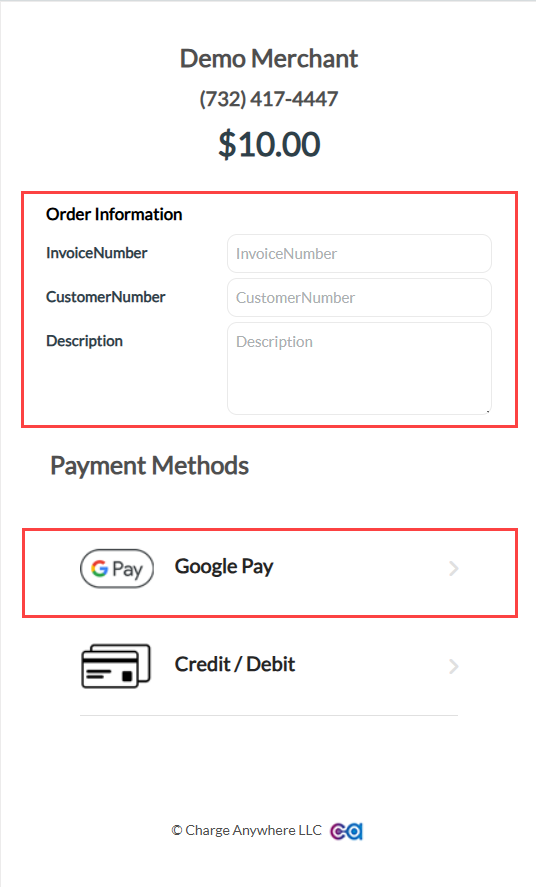
8.1.2 Credit/Debit Card Payment (Mobile View)
Steps to Process a Payment Using Credit/Debit Card on Mobile:
1. Tap on Credit/Debit under the Payment Methods section.
2. Enter Order Information (If Applicable)
- Invoice Number
- Customer Number
- Description
3. Enter a valid Customer Email in the designated field.
4. Provide Shipping Information
- Enter the following details:
- First Name and Last Name
- Address Line 1 (Required)
- Address Line 2 (Optional)
- City and Zip Code
- Country
5. Fill in Card Details
- Enter the following payment information:
- Card Number (Visa, MasterCard, American Express, Discover)
- Expiry Date (MM/YY)
- CVV Code (3-digit for most cards, 4-digit for American Express)
6. Billing Address Selection
- If the Billing address is the same as Shipping, check the box to autofill the shipping details as the billing address.
- If the Billing address is different, uncheck the box and manually enter the billing information:
- Cardholder Name (First and Last Name)
- Address Line 1 (Required)
- Address Line 2 (Optional)
- City and Zip Code
- Country
8. Tap the Pay Now button to complete the transaction.

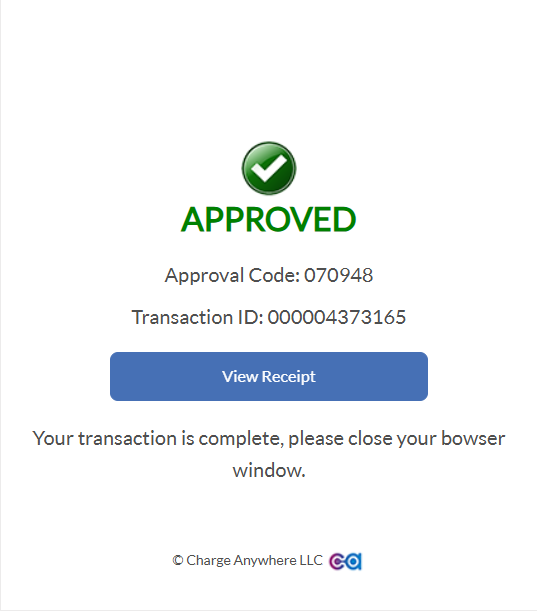
9. Transaction Approval Page
- If the payment is successful, an Approved message appears.
- The page displays the Approval Code and Transaction ID.
- Tap View Receipt to access and download the payment receipt. To learn more about payment receipts, refer to the Viewing and Managing Payment Receipt section.
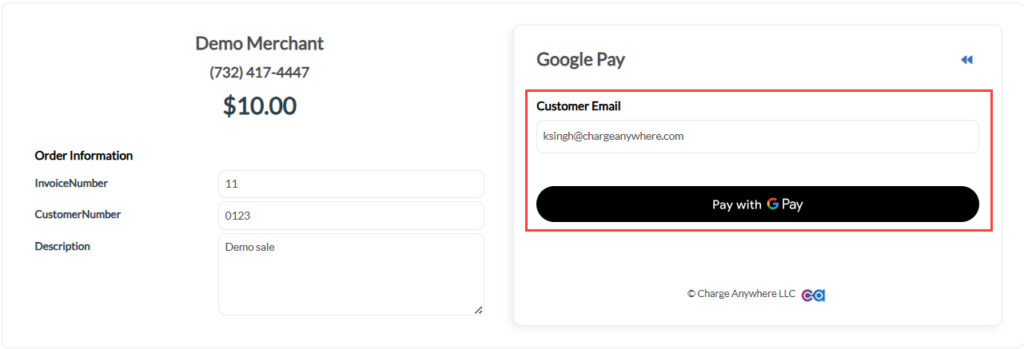
8.2.2 Google Pay Payment (Desktop View)
Steps to Process a Google Pay Payment on a Desktop
1. On the payment form, choose Google Pay under the Payment Methods section.
2. Enter Order Information (If Applicable)
- Invoice Number
- Customer Number
- Description

3. Provide a valid email address in the Customer Email field.
4. Click the Google Pay button to proceed with the transaction.
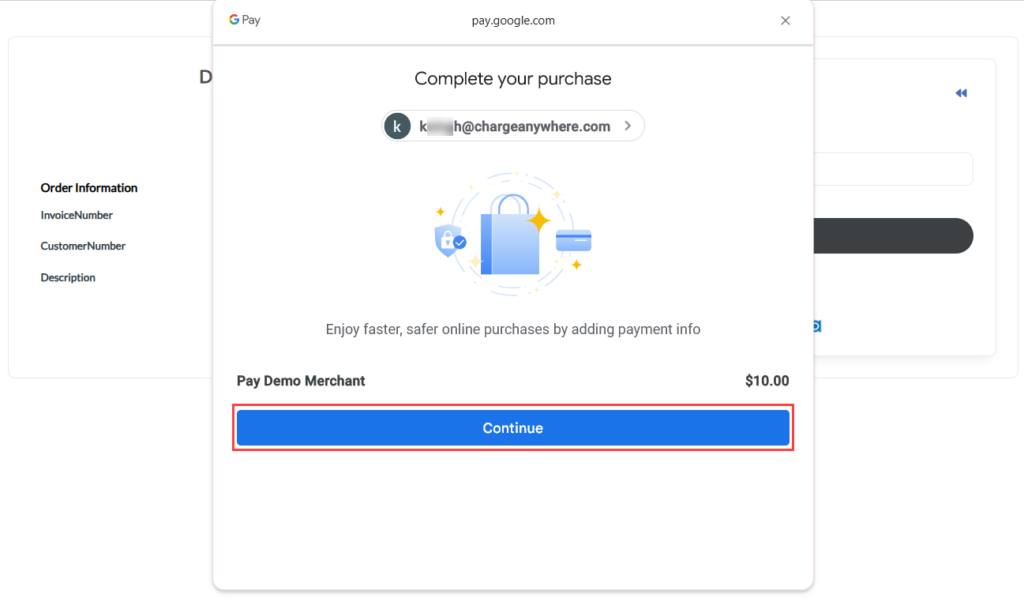
5. Google Pay Checkout Window Opens
- Click Continue to proceed.
- A Google Pay window appears displaying the merchant name and payment amount.
- Click Continue.
6. If a Google Pay account is already set up, it will display saved payment methods. Choose a saved card from Google Pay and click Continue. Otherwise, tap Payment Method to add a new payment card and Shipping to enter new shipping details.
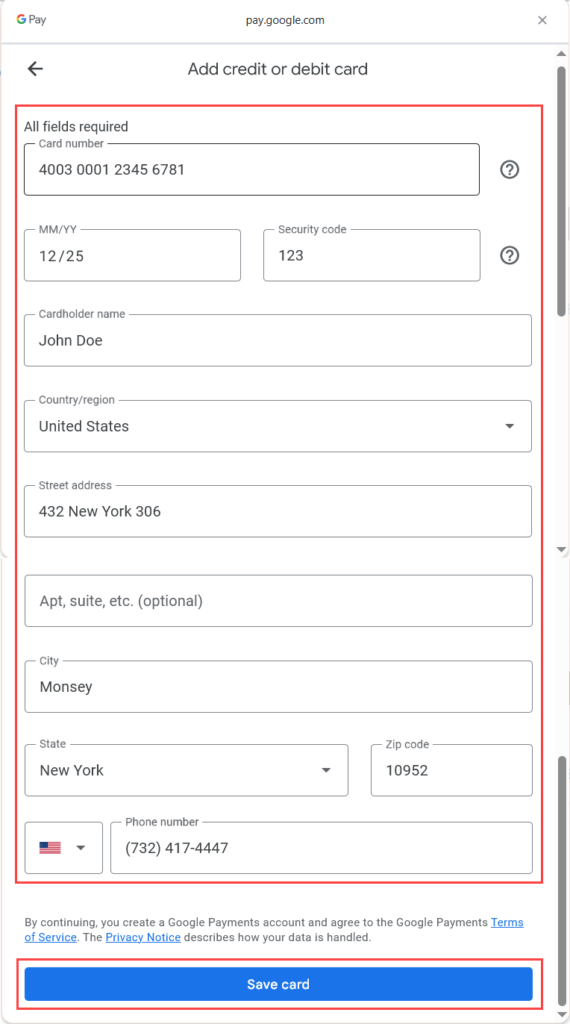
7. Enter Card Details (If Not Saved)
- If no payment method is saved, enter the following details:
- Card Number
- Expiration Date (MM/YY)
- Security Code (CVV)
- Cardholder Name
- Country/Region
8. Enter Shipping Details (If Not Saved)
- Provide the Street Address, Apartment/Suite (if applicable), City, State, Zip Code, and Phone Number.
9. Click Save Card to store payment details for future use.
10. After entering payment details, authorize the transaction through Google Pay.
11. Transaction Approval Page
- If the payment is successful, an Approved message appears.
- The page displays the Approval Code and Transaction ID.
- Click View Receipt to access and download the payment receipt. To learn more about payment receipts, refer to the Viewing and Managing Payment Receipt section.
8.2.2 Google Pay Payment (Mobile View)
When users open the payment link on a mobile device, the process for completing a Google Pay transaction remains similar but is optimized for mobile responsiveness.
Steps to Process a Google Pay Payment on Mobile
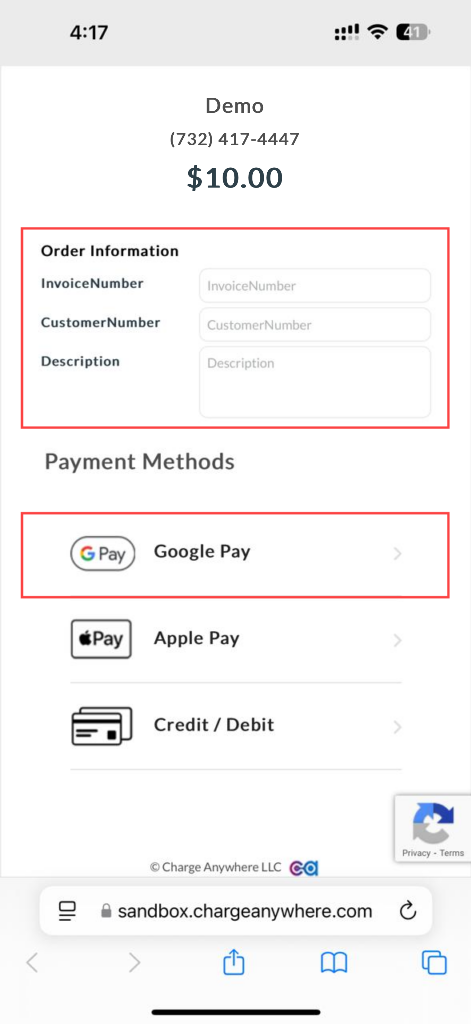
1. The payment page displays the Merchant Name, Order Information, and available Payment Methods (Google Pay, Apple Pay, and Credit/Debit).
2. Enter Order Information (If Applicable)
- Invoice Number
- Customer Number
- Description
3. Tap Google Pay under the Payment Methods section.
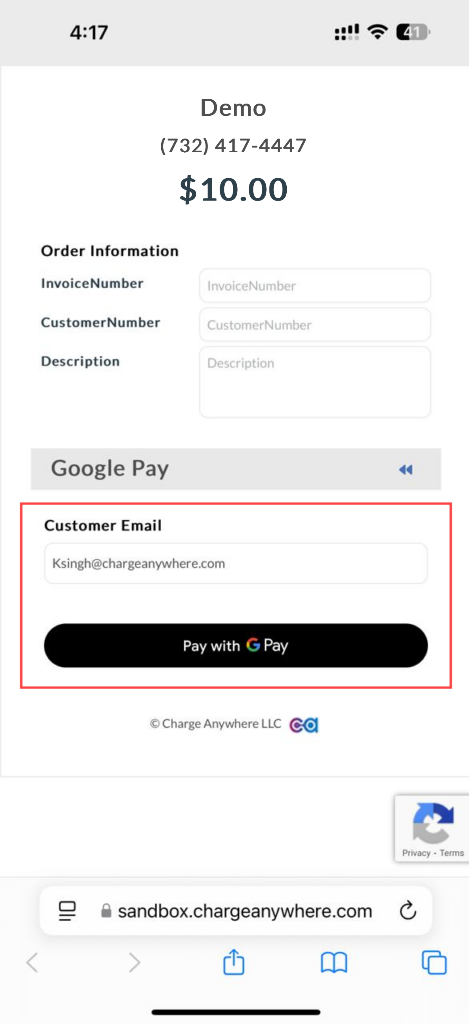
4. Provide a valid Customer Email in the designated field.
5. Tap Pay with Google Pay. The Google Pay checkout window will open.
6. Google Pay Checkout Window
- If the user has a Google Pay account, it will display the available payment methods.
- Tap Continue to proceed.
7. If no payment method is saved, enter the following details:
- Card Number
- Expiration Date (MM/YY)
- Security Code (CVV)
- Cardholder Name
- Country/Region
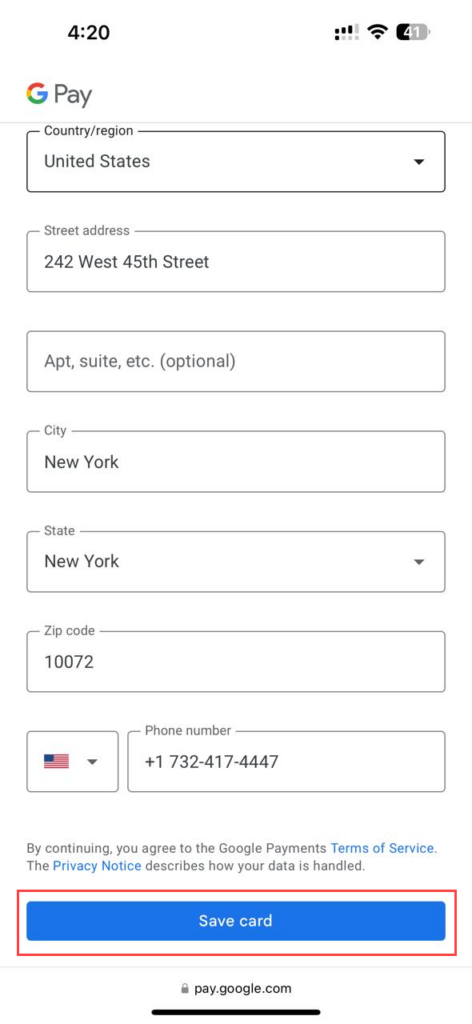
8. Provide the Street Address, Apartment/Suite (if applicable), City, State, Zip Code, and Phone Number.
9. Tap Save Card if the user wants to save the details for future payments.
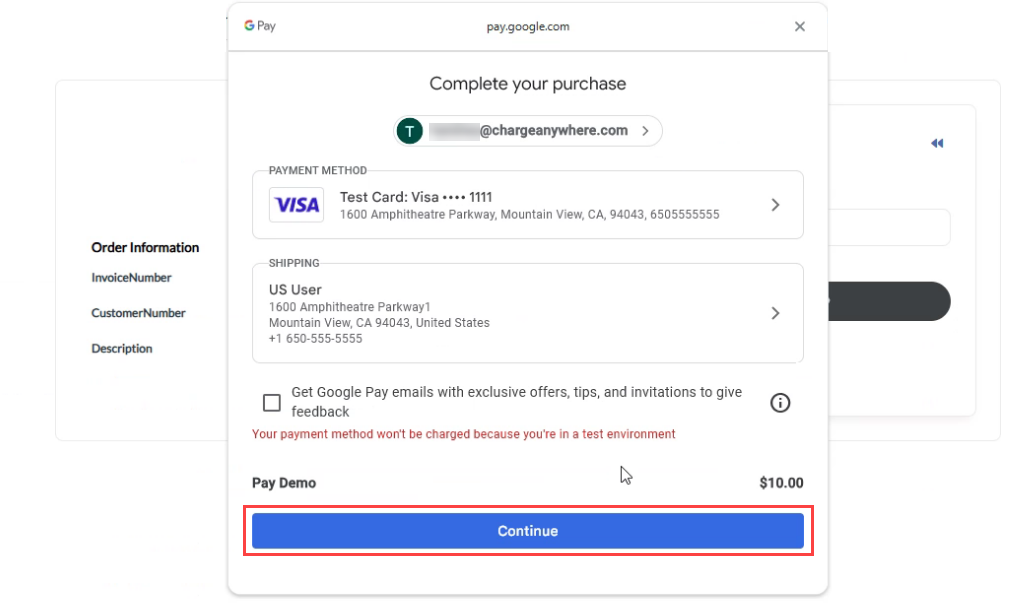
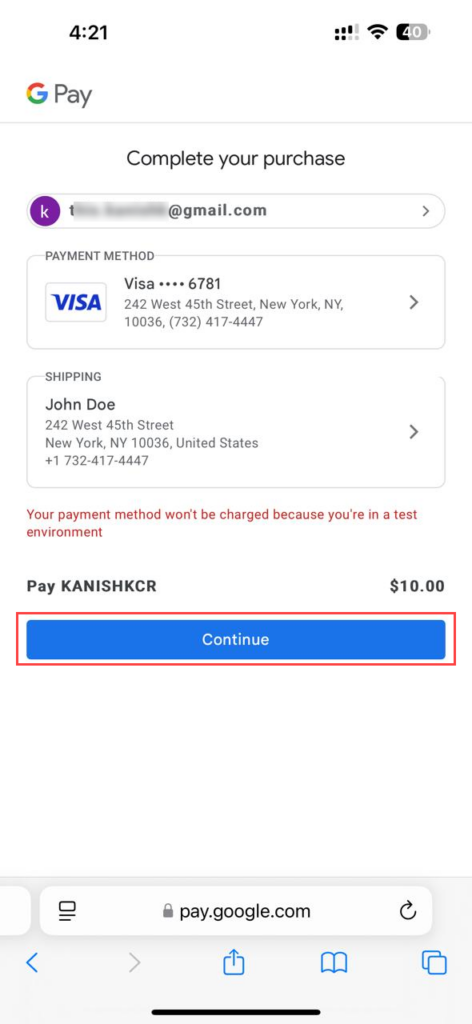
9. Review Payment Information
- The user will see their saved payment method and shipping address.
- A message may indicate that the payment is in a test environment (if applicable).
- Tap Continue to proceed.
10. Transaction Approval Page
- If the payment is successful, an Approved message appears.
- The page displays the Approval Code and Transaction ID.
- Tap View Receipt to access and download the payment receipt. To learn more about payment receipts, refer to the Viewing and Managing Payment Receipt section.
Key Differences Between Desktop and Mobile Views
| Feature | Desktop View | Mobile View |
|---|---|---|
| Payment Form | Displays full-screen on the browser. | Mobile-responsive, vertical layout. |
| Google Pay Button | Clickable button in the browser. | Touch-friendly button for tap payments. |
| Checkout Window | Opens in a pop-up modal. | Opens in a browser overlay. |
| User Input | Uses keyboard & mouse. | Touch-screen friendly, auto-fill enabled. |
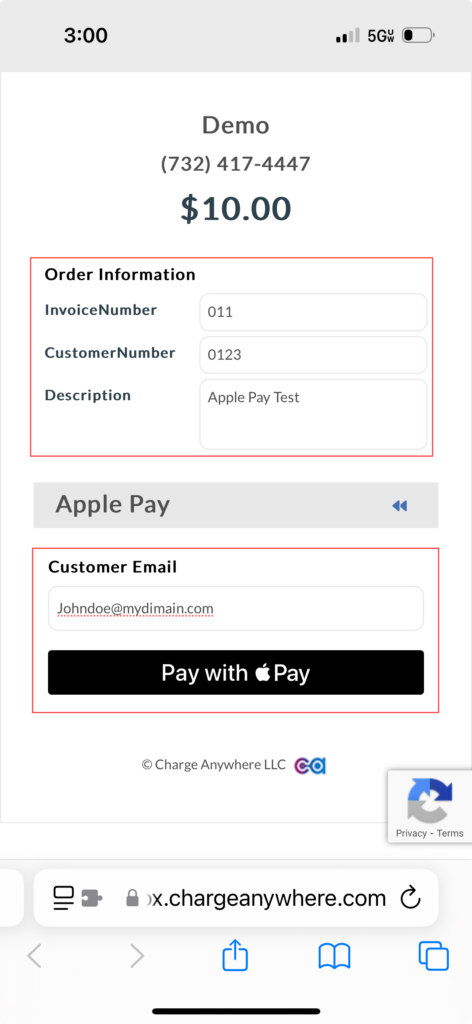
8.3 Apple Pay Payment
Steps to Process a Payment Using Apple Pay on Mobile:
1. The payment page displays the Merchant Name, Order Information, and available Payment Methods (Google Pay, Apple Pay, and Credit/Debit).
2. Enter Order Information (If Applicable)
- Invoice Number
- Customer Number
- Description
3. Tap Apple Pay under the Payment Methods section.
4. Provide a valid Customer Email in the designated field.
5. Tap Pay with Apple Pay. The Apple Pay checkout window will open.
6. Choose a saved card from Apple Pay or tap Change Payment Method to add a payment card to enter a new card.
8. If a new card is added, enter Card Number, Expiry Date, and CVV manually or use NFC scanning by holding the device near the card.
7. Provide Additional Details (If Required)
- If necessary, enter a phone number or email.
- Verify or update the billing and shipping address.
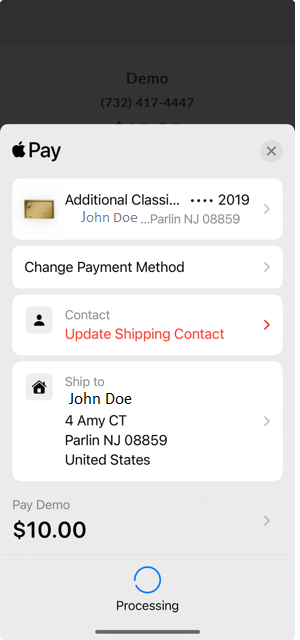
9. Transaction Approval Page
- If the payment is successful, an Approved message appears.
- The page displays the Approval Code and Transaction ID.
- Tap View Receipt to access and download the payment receipt. To learn more about payment receipts, refer to the Viewing and Managing Payment Receipt section.
Note: Apple Pay is available only on Apple devices with a configured Apple Pay account.
9. Viewing and Managing the Payment Receipt
Once a transaction is approved, the user can view and manage the payment receipt by clicking the View Receipt button on the approval page.
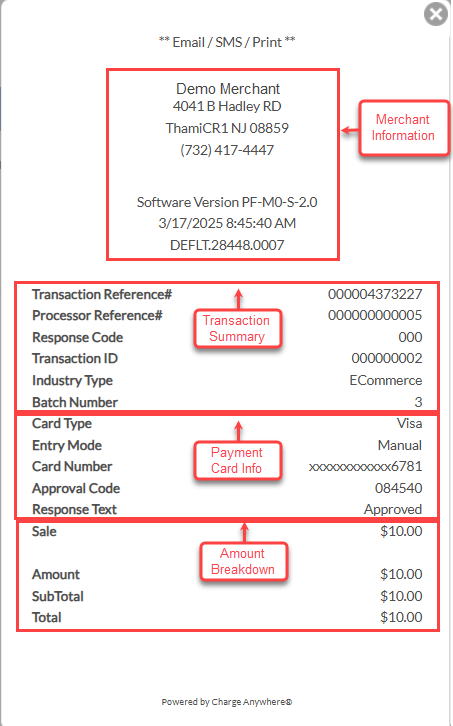
9.1 Receipt Structure and Field Explanations
The receipt contains several sections detailing the transaction. Below is a breakdown of each field:
| Section | Field | Description |
|---|---|---|
| Merchant Information | Merchant Name | Name of the business processing the payment. |
| Business Address | The registered address of the merchant. | |
| Phone Number | Merchant’s contact number for customer queries. | |
| Software Version | The version of the payment software used. | |
| Transaction Timestamp | The exact date and time when the transaction was processed. | |
| Device ID | Unique identifier of the payment terminal or virtual terminal used. | |
| Transaction Summary | Transaction Reference Number | A unique system-generated identifier for this transaction. |
| Processor Reference Number | A reference ID provided by the payment processor. | |
| Response Code | System response indicating the transaction status (e.g., 000 for successful transactions). | |
| Transaction ID | The unique ID assigned to this transaction. | |
| Industry Type | Type of business transaction (e.g., E-Commerce). | |
| Batch Number | The batch number under which this transaction was processed. | |
| Payment Card Details | Card Type | Type of card used (Visa, MasterCard, American Express, etc.). |
| Entry Mode | Method used to enter the card details (Manual, Contactless, etc.). | |
| Card Number | The card number used for payment. Only the last four digits are shown for security (xxxx xxxx xxxx 6781). | |
| Approval Code | A system-generated code confirming payment approval. | |
| Response Text | Status of the transaction (e.g., Approved). | |
| Amount Breakdown | Sale | The total sale amount. |
| Amount | The base amount. | |
| Subtotal | The amount before applying additional fees (if any). | |
| Total | The final amount billed to the customer. |
9.2 Receipt Options
At the top of the receipt, there are three action icons that allow the user to:
- Email Receipt: Send the transaction details via email.
- Send Receipt via SMS: Send a text message containing the receipt.
- Print Receipt: Print a physical copy of the receipt for record-keeping.
10. Conclusion
This guide details how to configure, generate, and use a payment form in Charge Anywhere based on the latest UI changes. Following these steps ensures seamless payment processing for your customers.
Subscribe to Documentation Updates
Receive a monthly summary of new and updated technical documents.