Introduction
The Auth Only Database in the Virtual Terminal manages transactions that have been authorized but not yet captured. These transactions await further action, such as capturing or deleting. This guide provides detailed instructions on navigating the Auth Only Database, searching for specific transactions, and managing authorized-only transactions, including a deep dive into the detailed Transaction ID screen and its available actions.
Navigating to Auth Only Database
To access the Auth Only Database:
- Login to Transaction Manager.
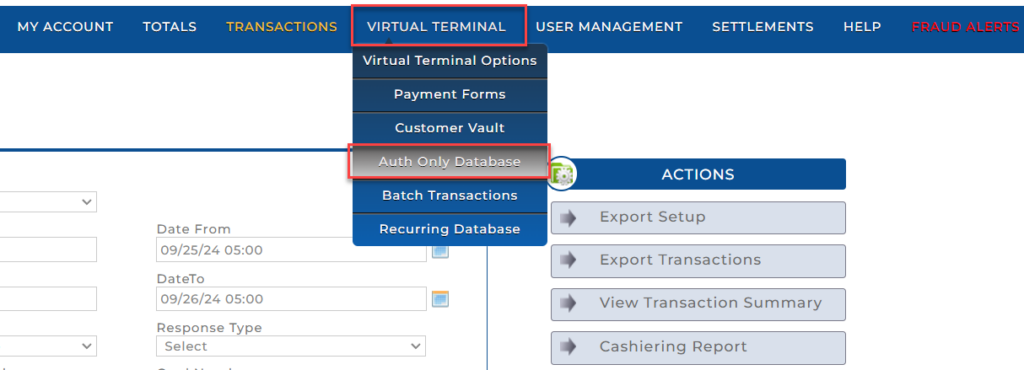
- Navigate to the Virtual Terminal option in the top menu.
- From the dropdown, select Auth Only Database.
- This takes you to a screen where you can view, search, and manage transactions that have been authorized but are pending capture or deletion.
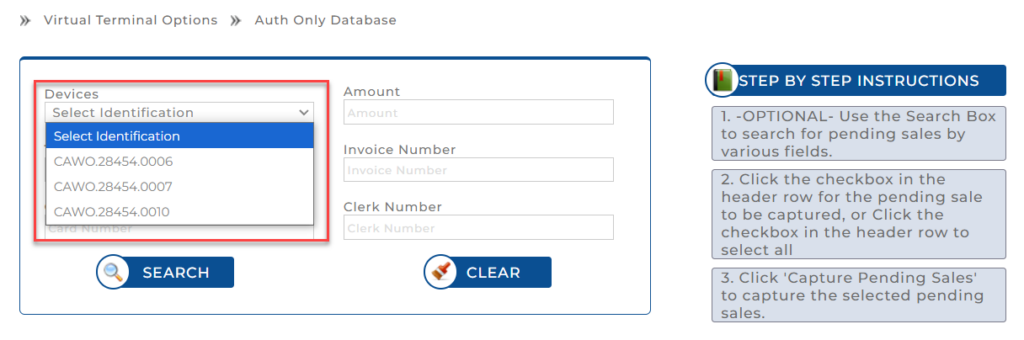
Auth Only Database Overview
Once you’ve navigated to the Auth Only Database screen, you’ll be presented with various fields for searching and managing pending authorized transactions.
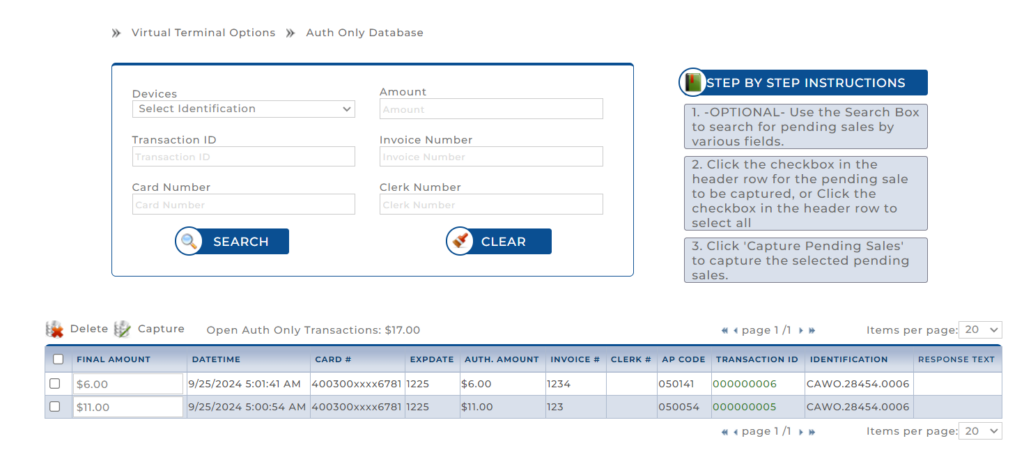
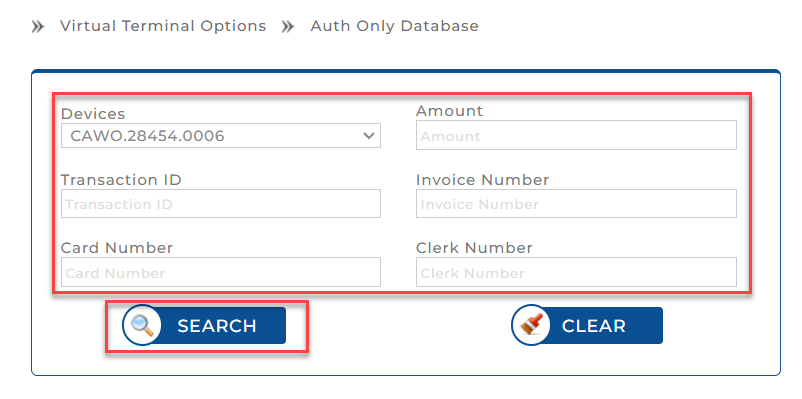
Search Fields:
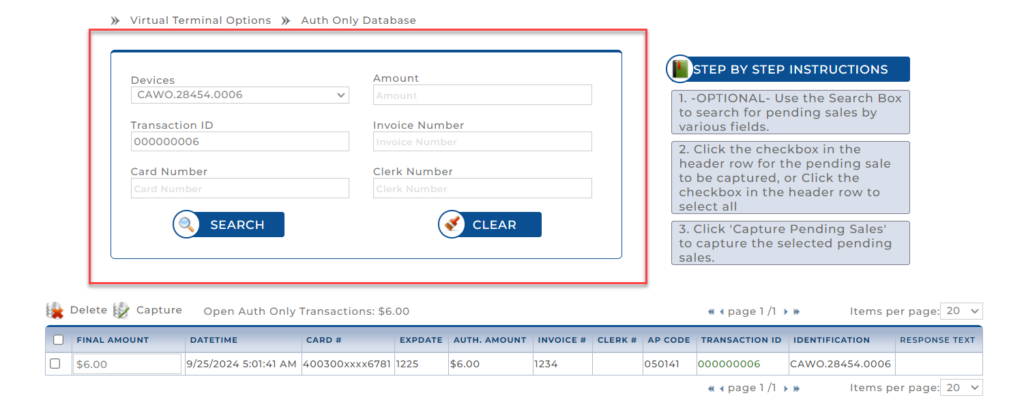
- Devices (Select Identification): Select the terminal or device where the transaction was processed.
- Transaction ID: Enter the unique transaction ID if you’re searching for a specific transaction.
- Card Number: Enter the masked card number (e.g., 4003xxxx) to locate transactions associated with a specific card.
- Amount: Search by entering the exact transaction amount.
- Invoice Number: Input the related invoice number to refine the search results.
- Clerk Number: Enter the clerk’s number who processed the transaction.
- Search Button: Click Search after entering relevant fields to retrieve matching transactions.
- Clear Button: Click Clear to reset all fields and start a new search.
Search Results:
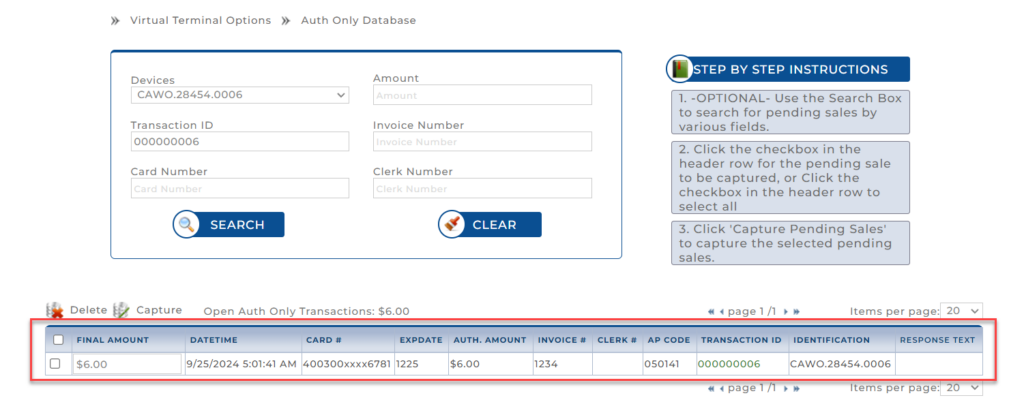
Once a search is conducted, matching transactions will appear in a table at the bottom of the page. The table includes:
- Final Amount: The total amount for the transaction.
- Datetime: Date and time the transaction was authorized.
- Card #: Masked card number used for the transaction.
- Expdate: Card expiration date.
- Auth Amount: The amount authorized during the transaction.
- Invoice #: Invoice number associated with the transaction.
- Clerk #: Clerk who processed the transaction.
- AP Code: Approval code for the transaction.
- Transaction ID: Clickable field that opens detailed transaction information.
- Identification: Identifies the terminal/device used.
- Response Text: Status of the transaction.
Managing Pending Transactions
Once you have located the desired transaction in the results:
- Delete: Click this to remove the selected transaction from the pending state. Deleted transactions will no longer be available for capture or any further actions.
- Capture: Click this to capture the authorized transaction. This action finalizes the transaction and moves it from an “authorized-only” state to a completed sale.

Transaction Details: Viewing Transaction ID Information
Clicking on the Transaction ID of any listed transaction will open a detailed view of the transaction’s information and available actions.

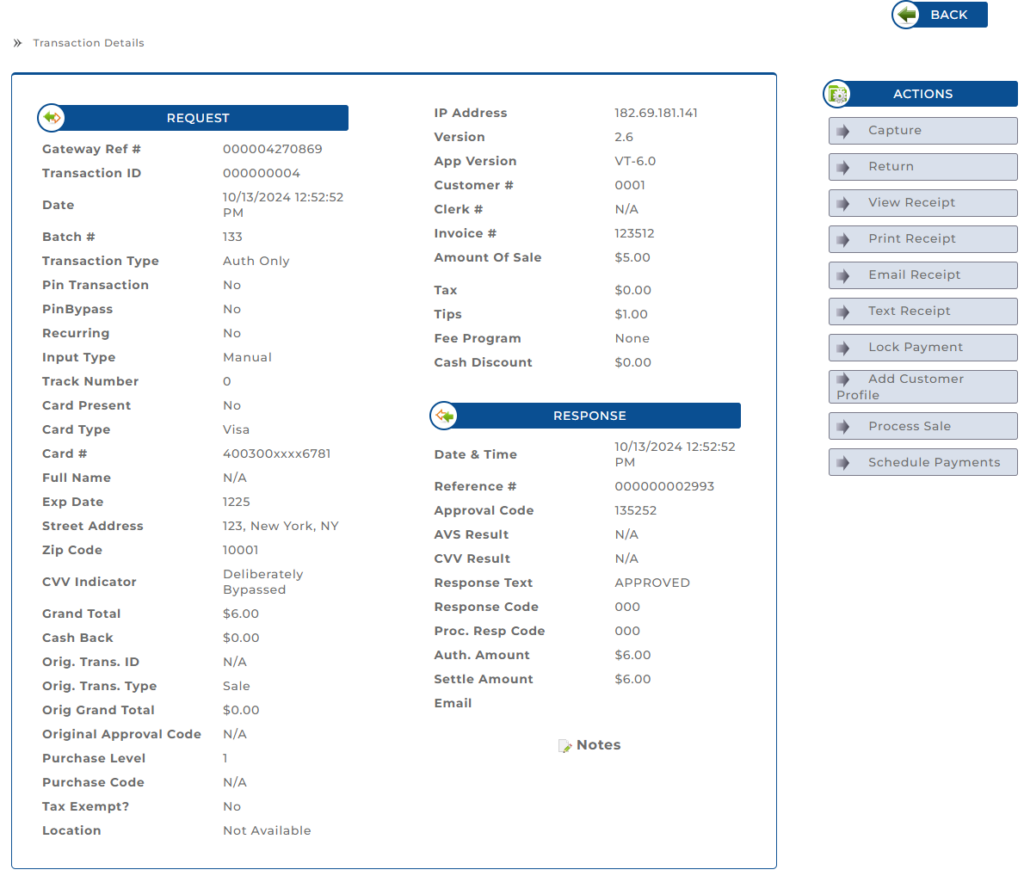
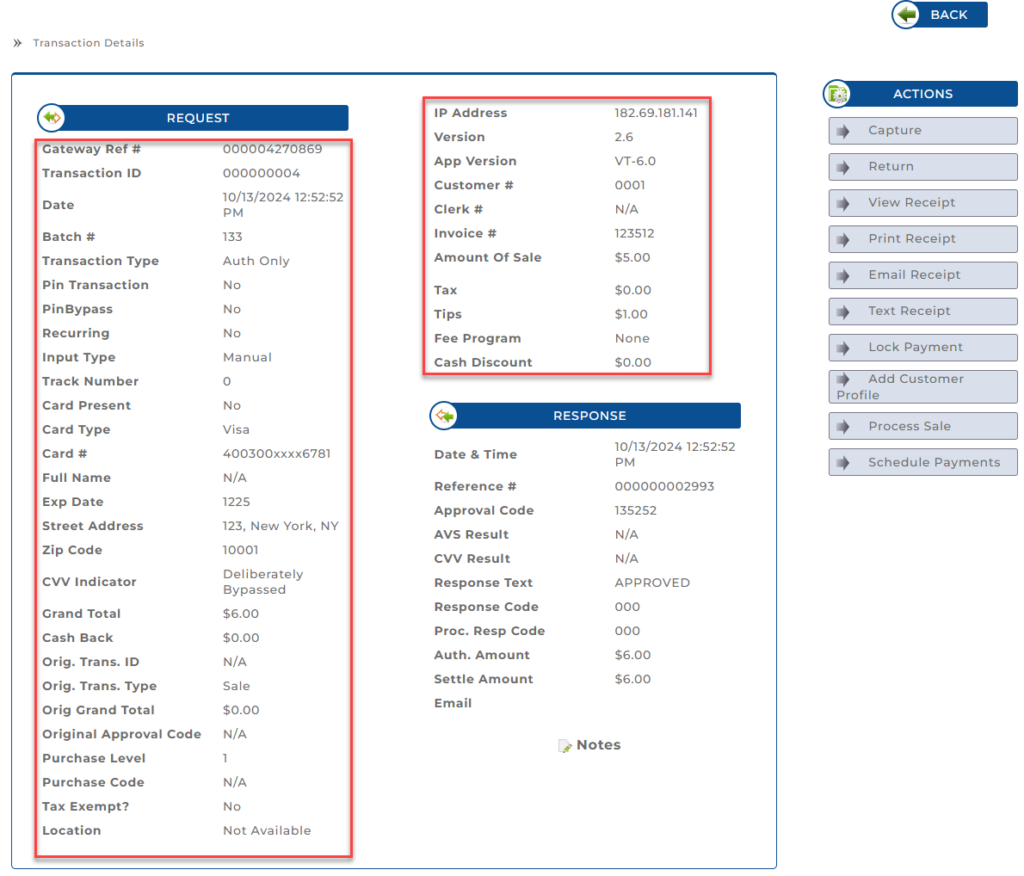
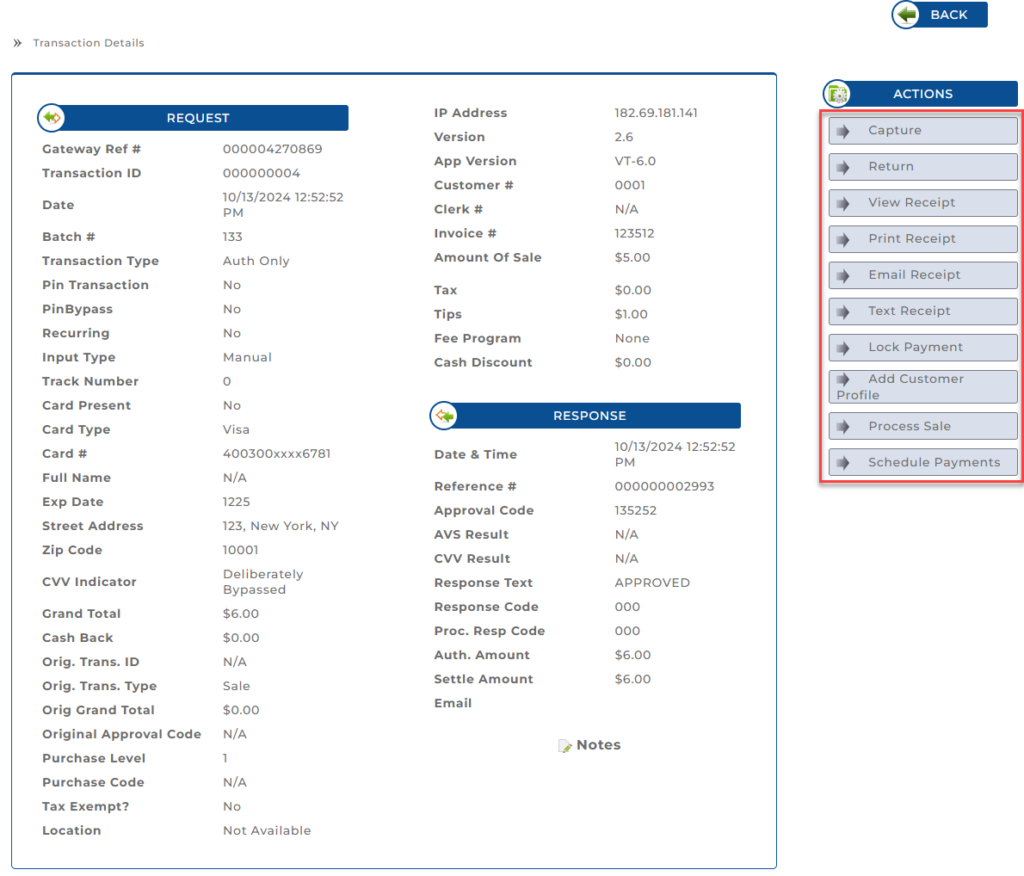
Transaction Details: Request Section
The Request section provides a comprehensive overview of the transaction request, including both merchant-side and cardholder details.
- Gateway Ref #: The unique reference number provided by the payment gateway for tracking purposes.
- Transaction ID: A unique identifier assigned to this specific transaction.
- Date: The exact date and time when the transaction was initiated.
- Batch #: The batch number associated with the transaction.
- Transaction Type: Specifies the type of transaction being conducted, in this case, “Auth Only” (authorization only).
- Pin Transaction: Indicates whether a PIN was used during the transaction (Yes/No).
- PinBypass: Shows if the PIN entry was bypassed (Yes/No).
- Recurring: Indicates whether the transaction is part of a recurring payment series (Yes/No).
- Input Type: Describes how the card information was entered, such as manually or by swiping.
- Card Present: Specifies whether the card was physically present during the transaction (Yes/No).
- Track Number: Displays the track number data read from the card, typically used for card-present transactions.
- Card Type: Identifies the type of card used for the transaction, like Visa or MasterCard.
- Card #: Shows the last four digits of the card number for security purposes.
- Full Name: Displays the cardholder’s name if provided.
- Exp Date: The expiration date of the card, usually in MMYY format.
- Street Address, Zip Code: The billing address details provided by the cardholder.
- CVV Indicator: Specifies whether CVV validation was bypassed or processed.
- Grand Total: The total amount of the transaction, including all taxes and fees.
- Cash Back: Any cash back amount requested during the transaction.
- Orig. Trans. ID: The original transaction ID, relevant in cases like returns or voids where an initial transaction ID is referenced.
- Orig. Trans. Type: The type of the original transaction, if applicable.
- Orig. Grand Total: The total amount of the original transaction, if applicable.
- Original Approval Code: Approval code from the original transaction, if relevant.
- Purchase Level: Indicates the level of data provided for the transaction, often used for commercial cards.
- Purchase Code: A code associated with specific purchase data.
- Tax Exempt?: Indicates whether the transaction was marked as tax-exempt.
- Location: The location associated with the transaction, if available.
- IP Address: The IP address from which the transaction was initiated, useful for tracking the origin of the transaction.
- Version: The version number of the transaction processing system being used.
- App Version: The specific version of the application used to process the transaction, here labeled as “VT-6.0.”
- Customer #: A unique identifier assigned to the customer involved in the transaction.
- Clerk #: The identification number of the clerk who processed the transaction, if applicable.
- Invoice #: The invoice number associated with the transaction, often used for record-keeping and reconciliation.
- Amount Of Sale: The amount of the sale before any additional charges, such as tips or tax.
- Tax: The tax amount applied to the transaction. If no tax is applied, this will display as $0.00.
- Tips: The tip amount added to the transaction, if any.
- Fee Program: Indicates any fee program associated with the transaction. In this case, it is listed as “None.”
- Cash Discount: The discount provided to the customer for paying in cash, if applicable. If not applicable, it shows as $0.00.
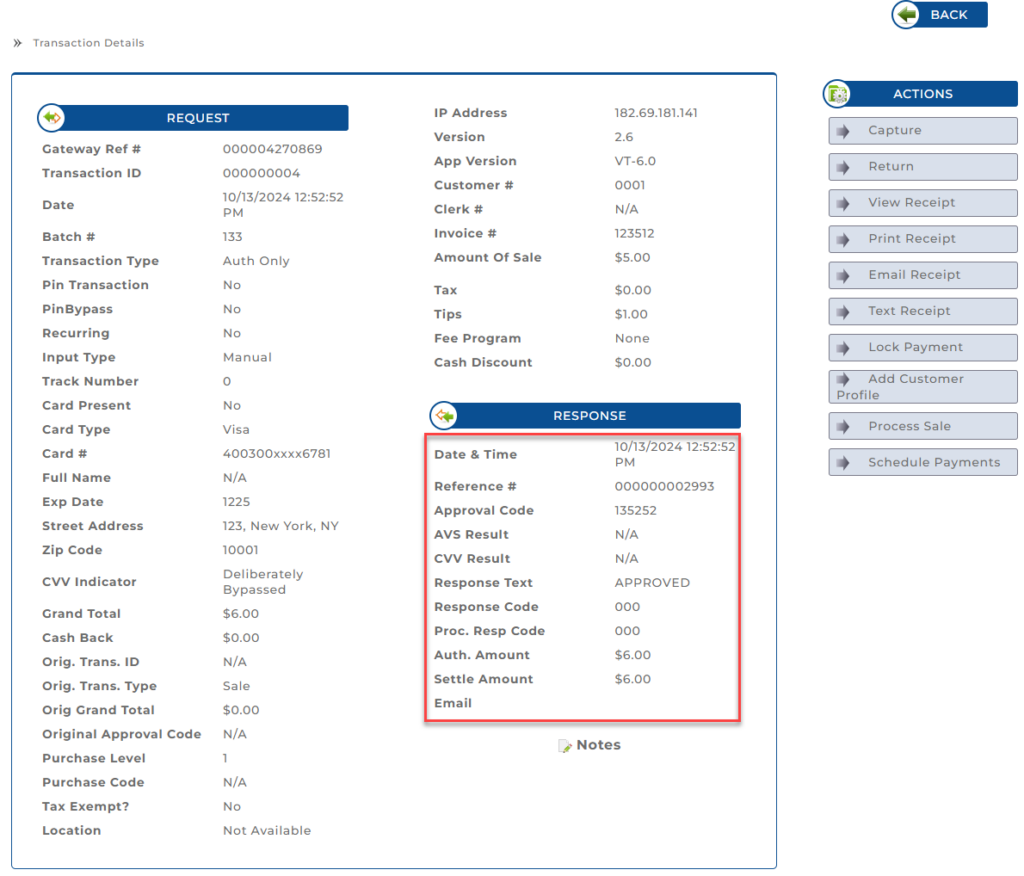
Transaction Details: Response Section
The Response section provides details on how the payment gateway responded to the transaction request.
- Date & Time: The date and time when the response was received, indicating when the transaction was processed.
- Reference #: A unique reference number for the transaction response, useful for tracking and verification.
- Approval Code: The authorization code provided by the issuing bank or payment processor.
- AVS Result: The result of the Address Verification Service (AVS) check, which confirms if the billing address matches the cardholder’s address on file. Displays as “N/A” if not applicable or bypassed.
- CVV Result: The result of the CVV (Card Verification Value) check, confirming whether the security code on the card was correctly provided. Displays as “N/A” if not applicable or bypassed.
- Response Text: A message indicating the transaction status, such as “APPROVED” or “DECLINED.”
- Response Code: A code indicating the result of the transaction.
- Proc. Resp Code: The processor’s response code, which provides additional details on the transaction’s status.
- Auth. Amount: The amount that was authorized for the transaction, which should match the sale amount unless adjusted.
- Settle Amount: The final amount settled or charged in the transaction, which may differ from the authorized amount in cases of adjustments.
- Email: Field for capturing the customer’s email address if provided, used for sending a transaction receipt.
Transaction Details: Notes
The Notes section allows users to add and view additional comments or details about a transaction. This feature helps in documenting important information related to the transaction, which can be referenced later.
Here are the steps to add a note to a transaction in the user guide:
- In the Transaction Details screen, locate and click the Notes icon.
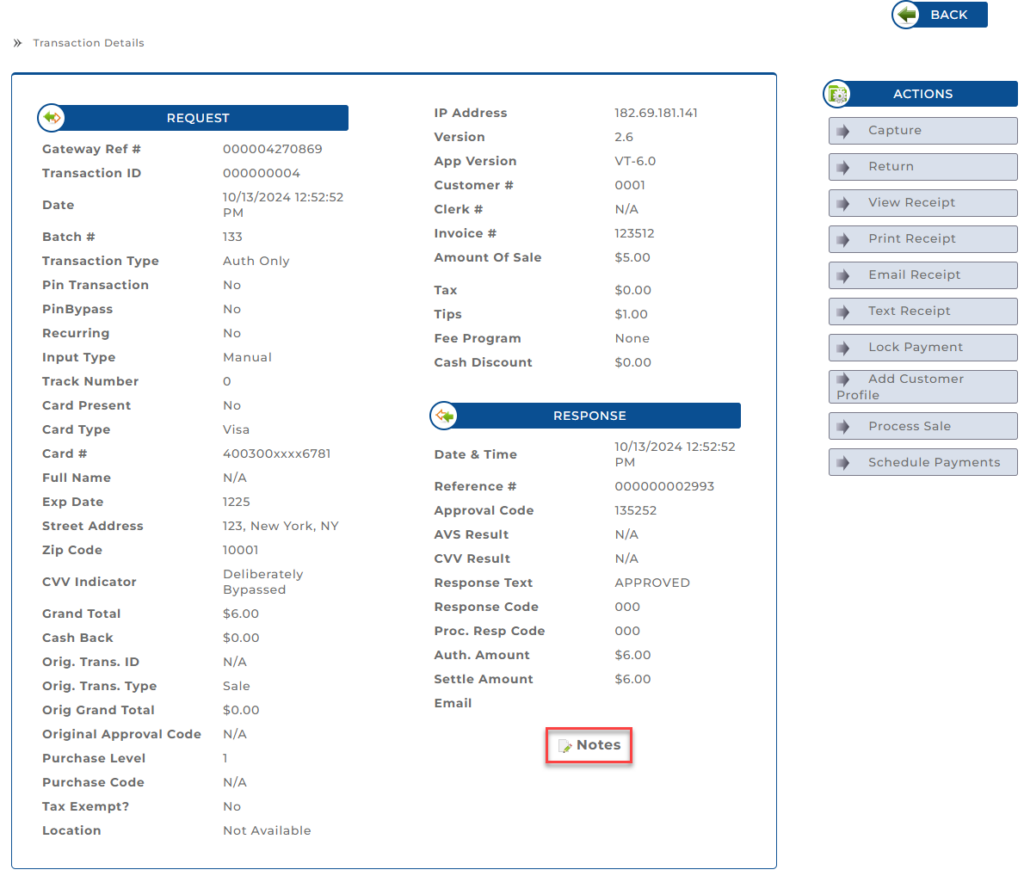
- A pop-up window labeled Notes will appear. Type your message into the provided text box. After entering your message, click Submit.
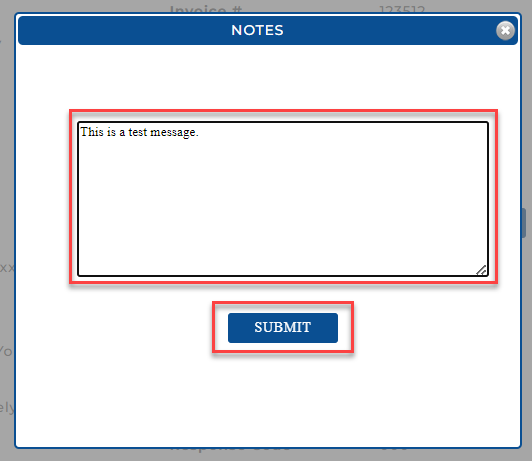
- Once submitted, the note will be displayed under the Notes section of the Transaction Details screen, along with your username and timestamp.

Transaction Details: Available Actions
On the right-hand side of the Transaction Details screen, a range of actions are available:
- Capture: Capture the authorized transaction to finalize it and settle the funds.
- Return: Process a return for this transaction.
- View Receipt: View the receipt details for the transaction.
- Print Receipt: Print a physical copy of the transaction receipt.
- Email Receipt: Send the receipt to the customer via email.
- Text Receipt: Send the receipt to the customer via SMS.
- Lock Payment: Lock the payment to prevent any further changes or actions.
Note: The Lock Payment action is irreversible. Once a payment is locked, it cannot be unlocked or undone. Please exercise caution when selecting this option to avoid unintentional errors. - Add Customer Profile: Add the customer information from this transaction to the Customer Vault for future use.
- Process Sale: Initiate a sale transaction using the stored details.
- Schedule Payments: Set up a payment schedule for this transaction.
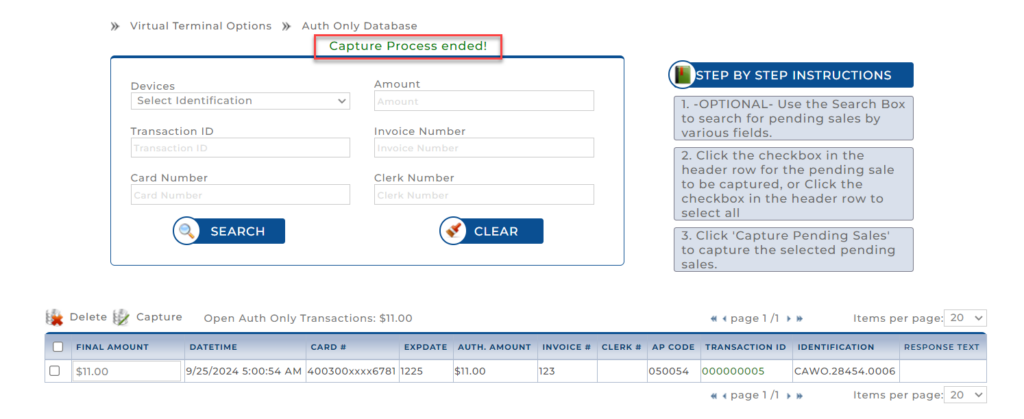
Steps to Capture a Transaction
This section guides users through the processs of managing authorized-only transactions:
1. Select Device: Select the device from the Devices dropdown.
2. Search for Pending Sales: Use the search fields to locate pending sales by entering details such as Transaction ID, Card Number, or Amount.
3. Select Transactions: Use the checkboxes next to each transaction to select one or multiple transactions. Alternatively, use the checkbox in the header to select all transactions at once.

4. Capture Pending Sales: Click Capture to finalize and process the selected transactions.

5. Successful Capture: After the transaction is captured, the Capture Process Ended message is displayed.
Additional Notes
- Authorized-Only Transactions: These transactions are in a temporary state where the payment is approved, but the funds have not yet been transferred. The merchant must capture the transaction to complete the process.
- Capturing vs. Deleting: Once captured, the transaction is finalized, and funds will be transferred. If deleted, the transaction is canceled, and no further action can be taken.
Subscribe to Documentation Updates
Receive a monthly summary of new and updated technical documents.