Overview
This document provides detailed step-by-step instructions for setting up devices supported by the QuickSale 2.0 app. Each section is dedicated to a specific device, including connection guidelines and visual references to ensure a seamless setup process.
WizarPOS Terminal
Supported Models
- Q2
- Q3
- Q2 Premium
Q2

- Local Connection Setup:
- Ensure the WizarPOS terminal is powered on.
- Connecting Terminal Devices:
- Open the QuickSale 2.0 app on the WizarPOS terminal.
- Navigate to Configuration > Set Up Options > Equipment Set Up.
- If the card reader is not configured, it will display Peripheral Device Not Configured. Tap Card Reader, and you will be prompted to Choose Device Type.
- You will see a dialog box asking you to select the connection type:
- Bluetooth
- USB
- Local
- Select Local to connect the device locally.
- Remote Key Injection (RKI):
- The RKI process is initiated automatically once the device (Card Reader or Printer) is successfully connected.
Q3

- Local Connection Setup:
- Ensure the WizarPOS terminal is powered on.
- Connecting Terminal Devices:
- Open the QuickSale 2.0 app on the WizarPOS terminal.
- Navigate to Configuration > Set Up Options > Equipment Set Up.
- If the card reader is not configured, it will display Peripheral Device Not Configured. Tap Card Reader, and you will be prompted to Choose Device Type.
- You will see a dialog box asking you to select the connection type:
- Bluetooth
- USB
- Local
- Select Local to connect the device locally.
- Remote Key Injection (RKI):
- The RKI process is initiated automatically once the device (Card Reader or Printer) is successfully connected.
Q2 Premium

- Local Connection Setup:
- Ensure the WizarPOS terminal is powered on.
- Connecting Terminal Devices:
- Open the QuickSale 2.0 app on the WizarPOS terminal.
- Navigate to Configuration > Set Up Options > Equipment Set Up.
- If the card reader is not configured, it will display Peripheral Device Not Configured. Tap Card Reader, and you will be prompted to Choose Device Type.
- You will see a dialog box asking you to select the connection type:
- Bluetooth
- USB
- Local
- Select Local to connect the device locally.
- Remote Key Injection (RKI):
- The RKI process is initiated automatically once the device (Card Reader or Printer) is successfully connected.
Miura Devices
Supported Models
- PTS3
- PTS5
PTS3
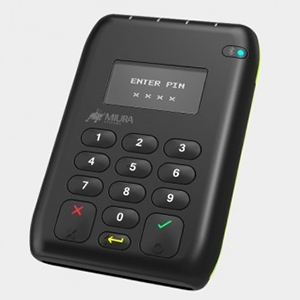
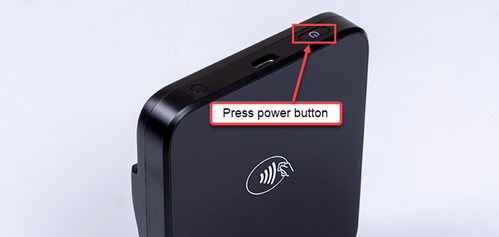
- Bluetooth Pairing:
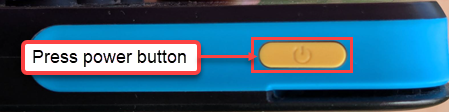
- Power on the PTS3 device by pressing the power button. Bluetooth will be enabled automatically.

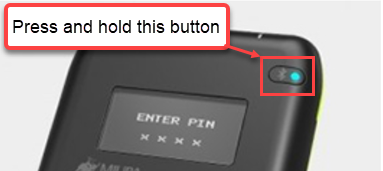
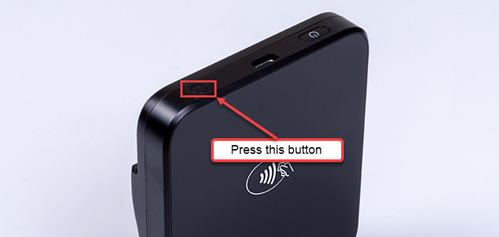
- To initiate pairing mode, press and hold the Bluetooth pairing button for 5 seconds until it starts blinking rapidly.
- On your Android phone, go to Settings > Bluetooth.
- Locate and select the PTS3 device in the available devices list.
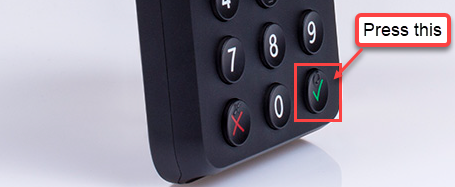
- Press the green tick mark button (as shown in the image below) on the PTS3 device to complete the pairing process.

- Power on the PTS3 device by pressing the power button. Bluetooth will be enabled automatically.
- App Configuration:
- Open the QuickSale 2.0 app on your phone.
- Navigate to Configuration > Set Up Options > Equipment Set Up.
- If the card reader is not configured, it will display Peripheral Device Not Configured. Tap Card Reader, and you will be prompted to Choose Device Type.
- You will see a dialog box asking you to select the connection type:
- Bluetooth
- USB
- Local
- Select Bluetooth to connect the card reader.
- Pairing the Device:
- The app displays a list of Bluetooth devices.
- Once the card reader is found, select it from the list, and it will begin the pairing process.
- You will see a Connecting Device prompt while the device is being paired.
- Remote Key Injection (RKI):
- The RKI process is initiated automatically once the device (Card Reader or Printer) is successfully connected.
PTS5
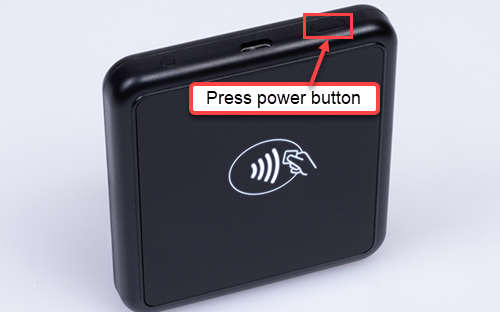
- Bluetooth Pairing:
- Power on the PTS5 device by pressing the power button. Bluetooth will be enabled automatically.
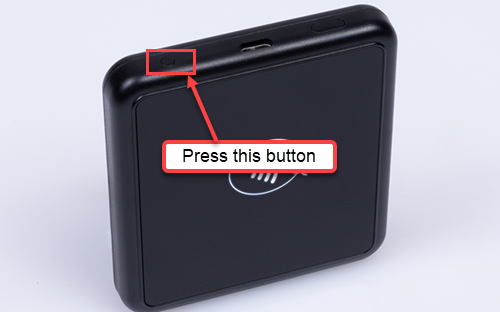
- To initiate pairing mode, press and hold the Bluetooth pairing button for 5 seconds until it starts blinking rapidly.
- On your Android phone, go to Settings > Bluetooth.
- Locate and select the PTS3 device in the available devices list.
- Press the green tick mark button (as shown in the image below) on the PTS3 device to complete the pairing process.
- Power on the PTS5 device by pressing the power button. Bluetooth will be enabled automatically.
- App Configuration:
- Open the QuickSale 2.0 app on your phone.
- Navigate to Configuration > Set Up Options > Equipment Set Up.
- If the card reader is not configured, it will display Peripheral Device Not Configured. Tap Card Reader, and you will be prompted to Choose Device Type.
- You will see a dialog box asking you to select the connection type:
- Bluetooth
- USB
- Local
- Select Bluetooth to connect the card reader.
- Connecting the Device:
- The app displays a list of Bluetooth devices.
- Once the card reader is found, select it from the list, and it will begin the pairing process.
- You will see a Connecting Device prompt while the device is being paired.
- Remote Key Injection (RKI):
- The RKI process is initiated automatically once the device (Card Reader or Printer) is successfully connected.
Datecs Devices
Supported Models
- BluePad 50 Plus
- BlueLite v2
- BlueLite v4
- BlueCash 50
- BluePad 5500 Plus
BluePad 50 Plus

Bluetooth Connection
- Pair the Device:
- Power on the BluePad 50 Plus device by pressing the power button. Bluetooth will be enabled automatically.
- Go to Settings > Bluetooth on your Android phone.
- Select the BluePad 50 Plus device from the available devices list.
- Press the green tick mark button (as shown in the image below) on the BluePad 50 Plus device to complete the pairing process.
- Power on the BluePad 50 Plus device by pressing the power button. Bluetooth will be enabled automatically.
- Configure in App:
- Open the QuickSale 2.0 app on your phone.
- Navigate to Configuration > Set Up Options > Equipment Set Up.
- If the card reader is not configured, it will display Peripheral Device Not Configured. Tap Card Reader, and you will be prompted to Choose Device Type.
- You will see a dialog box asking you to select the connection type:
- Bluetooth
- USB
- Local
- Select Bluetooth to connect the card reader.
- Connecting the Device:
- The app displays a list of Bluetooth devices.
- Once the card reader is found, select it from the list, and it will begin the pairing process.
- You will see a Connecting Device prompt while the device is being paired.
- Remote Key Injection (RKI):
- The RKI process is initiated automatically once the device (Card Reader or Printer) is successfully connected.
USB Connection
- Connect via USB:
- Use a compatible USB cable to connect the BluePad 50 Plus device to your Android phone.
- Ensure the device is powered on.
- App Configuration:
- Open the QuickSale 2.0 app on your phone.
- Navigate to Configuration > Set Up Options > Equipment Set Up.
- If the card reader is not configured, it will display Peripheral Device Not Configured. Tap Card Reader, and you will be prompted to Choose Device Type.
- You will see a dialog box asking you to select the connection type:
- Bluetooth
- USB
- Local
- Select USB to connect the card reader. The device is recognized once connected.
BlueLite v2

Bluetooth Connection
- Pair the Device:
- Power on the Bluelite v2 device by pressing the power button. Bluetooth will be enabled automatically.
- Go to Settings > Bluetooth on your Android phone or WizarPOS device.
- Select the Datecs device from the available devices list.
- Four white LEDs will blink rapidly after selecting the device from the phone or WizarPOS.
- Press the pairing button (as shown in the image below) on the Bluelite v2 device to complete the pairing process.
- Power on the Bluelite v2 device by pressing the power button. Bluetooth will be enabled automatically.
- Configure in App:
- Open the QuickSale 2.0 app on your phone.
- Navigate to Configuration > Set Up Options > Equipment Set Up.
- If the card reader is not configured, it will display Peripheral Device Not Configured. Tap Card Reader, and you will be prompted to Choose Device Type.
- You will see a dialog box asking you to select the connection type:
- Bluetooth
- USB
- Local
- Select Bluetooth to connect the card reader.
USB Connection
- Connect via USB:
- Use a compatible USB cable to connect the Bluelite v2 device to your Android phone.
- Ensure the device is powered on.
- App Configuration:
- Open the QuickSale 2.0 app on your phone.
- Navigate to Configuration> Set Up Options > Equipment Set Up.
- If the card reader is not configured, it will display Peripheral Device Not Configured. Tap Card Reader, and you will be prompted to Choose Device Type.
- You will see a dialog box asking you to select the connection type:
- Bluetooth
- USB
- Local
- Select USB to connect the card reader. The device should be recognized once connected.
BlueLite v4

Bluetooth Connection
- Pair the Device:
- Power on the Bluelite v4 device by pressing the power button. Bluetooth will be enabled automatically.
- Go to Settings > Bluetooth on your Android phone or WizarPOS device.
- Select the Datecs device from the available devices list.
- Four white LEDs will blink rapidly after selecting the device from the phone or WizarPOS.
- Press the pairing button (as shown in the image below) on the Bluelite v4 device to complete the pairing process.
- Power on the Bluelite v4 device by pressing the power button. Bluetooth will be enabled automatically.
- Configure in App:
- Open the QuickSale 2.0 app on your phone.
- Navigate to Configuration> Set Up Options > Equipment Set Up.
- If the card reader is not configured, it will display Peripheral Device Not Configured. Tap Card Reader, and you will be prompted to Choose Device Type.
- You will see a dialog box asking you to select the connection type:
- Bluetooth
- USB
- Local
- Select Bluetooth to connect the card reader.
USB Connection
- Connect via USB:
- Use a compatible USB cable to connect the BlueLite v4 device to your Android phone.
- Ensure the device is powered on.
- App Configuration:
- Open the QuickSale 2.0 app on your phone.
- Navigate to Configuration> Set Up Options > Equipment Set Up.
- If the card reader is not configured, it will display Peripheral Device Not Configured. Tap Card Reader, and you will be prompted to Choose Device Type.
- You will see a dialog box asking you to select the connection type:
- Bluetooth
- USB
- Local
- Select USB to connect the card reader. The device should be recognized once connected.
BlueCash 50

- Local Connection Setup:
- Ensure the BlueCash 50 is powered on.
- Connecting Terminal Devices:
- Open the QuickSale 2.0 app on BlueCash 50.
- Navigate to Configuration> Set Up Options > Equipment Set Up.
- If the card reader is not configured, it will display Peripheral Device Not Configured. Tap Card Reader, and you will be prompted to Choose Device Type.
- You will see a dialog box asking you to select the connection type:
- Bluetooth
- USB
- Local
- Select Local to connect the device locally.
- Remote Key Injection (RKI):
- The RKI process is initiated automatically once the device (Card Reader or Printer) is successfully connected.
BluePad 5500 Plus
- Local Connection Setup:
- Ensure the BluePad 5500 Plus is powered on.
- Connecting Terminal Devices:
- Open the QuickSale 2.0 app on BluePad-5500 Plus.
- Navigate to Configuration> Set Up Options > Equipment Set Up.
- If the card reader is not configured, it will display Peripheral Device Not Configured. Tap Card Reader, and you will be prompted to Choose Device Type.
- You will see a dialog box asking you to select the connection type:
- Bluetooth
- USB
- Local
- Select Local to connect the device locally.
- Remote Key Injection (RKI):
- The RKI process is initiated automatically once the device (Card Reader or Printer) is successfully connected.
IDTECH Devices
VP3300

- USB Connection:
- Use a micro-USB to Type-C cable to connect the VP3300 device to your phone.
- Ensure the device is powered on.
- App Configuration:
- Open the QuickSale 2.0 app on your phone.
- Navigate to Configuration> Set Up Options > Equipment Set Up.
- If the card reader is not configured, it will display Peripheral Device Not Configured. Tap Card Reader, and you will be prompted to Choose Device Type.
- You will see a dialog box asking you to select the connection type:
- Bluetooth
- USB
- Local
- Select USB to connect the card reader. The device should be recognized once connected.
Subscribe to Documentation Updates
Receive a monthly summary of new and updated technical documents.